You are using an out of date browser. It may not display this or other websites correctly.
You should upgrade or use an alternative browser.
You should upgrade or use an alternative browser.
کارشناسی | هندسه مناظر و مرایا
- شروع کننده موضوع Baha2r
- تاریخ شروع

Pedram-viva
کاربر بیش فعال
سلام دوستانسلام به همگی
ممنون بهادر جان بخاطر عکسهای خوبی که گذاشتی منم موافقم که اگه می تونی با توضیح همراه باشه.
درضمن هرکس کتابی میشناسه که آموزش پرسپکتیو از پایه رو آموزش میده لطفا معرفی کنه
من در ضمينه آموزش پرسپكتيو 2تا كتاب خيلي خوب دارم و به شما هم اونا رو معرفي ميكنم تا از اونا بتونيد استفاده كنيد.

1- عنوان: رسم فني و پرسپكتيو در طراحي معماري
مولف: سيد محمدرضا موسويان
انتشارات: آذرخش
2- پرسپكتيو و طراحي
انتشارات: يساولي
اگر در مورد پرسپكتيو چيز زيادي نمي دونيد پيشنهاد ميكنم اول كتاب (پرسپكتيو و طراحي) رو تهيه كنيد.
sadra86
عضو جدید
روش هندسی
روش هندسی
با سلام و خسته نباشید از بابت ایجاد این تاپیک سودمند.
آیا در ترسیم یک پرسپکتیو از یک موضوع میتوان متغیر هایی مانند ابعاد موضوع و فاصله آن از ناظر به طور هندسی و دقیق پیاده کرد. و اگر می شود چگونه؟ آیا ارزش این کار را دارد یا باید به روش حدسی فواصل و ابعاد را ترسیم کرد؟
روش هندسی
با سلام و خسته نباشید از بابت ایجاد این تاپیک سودمند.
آیا در ترسیم یک پرسپکتیو از یک موضوع میتوان متغیر هایی مانند ابعاد موضوع و فاصله آن از ناظر به طور هندسی و دقیق پیاده کرد. و اگر می شود چگونه؟ آیا ارزش این کار را دارد یا باید به روش حدسی فواصل و ابعاد را ترسیم کرد؟
آریو
عضو جدید
درود
شاید من منظورتونو خوب متوجه نشدم..ولی با فرض اینکه درست متوجه شدم باید بگم تو درس هندسه ی دو همینو یاد میدن دیگه!
تمام قوانین پرسپکتیو اثبات فیزیکی و ریاضی داره.
اولا تو هر نوع پرسپکتیوی ما تناسبات رو رعایت میکنیم پس حتما تمام اشکال با مقیاس خاصی منتقل میشن رو کاغذ ، البته اگه پرسپکتیومون عدسی یا مرکزی باشه مقیاس بسته به فاصلشون تغییر میکنه و اگه آگزنومتریک باشه مقیاس کل تصویر برابر یه عدد حقیقیه.
در مورد بدست آوردن اندازه ی دقیق اشکال برای ترسیم پرسپکتیو باید معلوم کنیم که فاصله ی ناضر و پرده ی تصویر و جسم با هم چقدن.اگه این سه تا مقدار معلوم باشن خیلی راحت میشه حساب کرد که تصویر خط مثلا یک متری رو کاغذ چه طولی داره.
اما موقعی که ما داریم دست آزاد کار میکنیم این چیزا اهمیتی نداره . اصلا ارزش کار به همینه که با چشم انجام بشه و شاید یه جاهایی خطا داشته باشیم.
بدرود
p.a.r.i
عضو جدید
با سلام و خسته نباشید از بابت ایجاد این تاپیک سودمند.
آیا در ترسیم یک پرسپکتیو از یک موضوع میتوان متغیر هایی مانند ابعاد موضوع و فاصله آن از ناظر به طور هندسی و دقیق پیاده کرد. و اگر می شود چگونه؟ آیا ارزش این کار را دارد یا باید به روش حدسی فواصل و ابعاد را ترسیم کرد؟
دقیق ترین روشش همین پست 15 هست که معمار باشی گذاشته!
یعنی پلانت رو با زاویه 30 و 60 میذاری و خطوط رو مطابق شکل رسم میکنی!اون وقت تناسبات کاملا درست در میاد. ولی نمیشه اشل گذاشت و یه ضلع رو اندازه گرفت.
روش خوبیه و البته یه کم وقت گیر.
suro0sh
عضو جدید
پرسپکتیوها دو دسته هستند:پرسپکتیوهایی که طبق دستگاه مختصات کشیده میشن(ایزومتریک ،دیمتریک،کاوالیر،پلان ابلیک،...)که این دستگاه مختصات تحت استاندارد امریکا و اروپاست.نوع دوم پرسپکتیو هایی که به نقطه گریز میرن و دارای خط افق هستند وبیشتر در کارهای هنری و معماری مورد استفاده قرار میگیره(یک نقطه ای،دو نقطه ای،سه نقطه ای)که این نقاط به اسم نقاط گریز یا فرار شناخته میشن ...
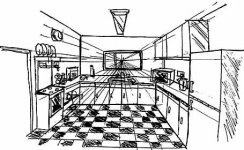
معمولاً پرسپکتيو به دو حالت اصلي شناخته مي شود:1_پرسپکتيو فضاي داخلي _مثل فضاي داخل اتاق ،راهرو،ساختمان و...تصوير4 2_پرسپکتيو فضاي خارجي _مثل فضاي خارج از ساختمان ،خيابان،شهر و فضاهاي باز .در اينجا لازم است اشاره کنيم که گاهي نيز طراحان از ترکيب دو حالت فوق استفاده مي کنند .
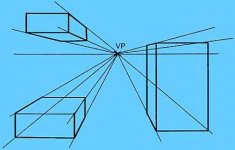
مشاهده و ترسيم اشيإ با شيوه پرسپکتيو نيز به چند روش صورت مي پذيرد که به طور عمده عبارتند از:پرسپکتيويک نقطه اي ،پرسپکتيودو نقطه اي و پرسپكتيوسه نقطه اي هر يک از موارد فوق شامل قوانيني نسبتاًساده هستند و چنانچه اشکال هندسي را با توجه به قوانين هر يک ترسيم نماييم مي توانيم از تنوع بي شماري که به وجود مي آيد استفاده کنيم.براي ترسيم پرسپکتيو يک شئ لازم است که ابتدا خط افق و نقطه گريز را مشخص کنيد.خط افق :فاصله چشم ناظر از سطح زمين تعيين کننده خط افق است .به عنوان مثال زماني که بر روي صندلي نشسته ايد و ارتفاع يا فاصله چشم شما از سطح زمين 5\1 متر است،خط افق براي شما در همان ارتفاع 5\1 متري واقع شده و به موازات نگاه شما قرار دارد.نقطه گريز:اگر حجم يا شکلي را که در پرسپکتيو قرار گرفته به دقت بررسي کنيد متوجه مي شويد که خطوط و زاويه هايي که دورتر قرار دارند همه به طرف خط افق رفته و در يک نقطه متمرکز مي شوند.به اين خطوط راهنما ،خطوط گريزنده يا خطوط سهمي نيز مي گويند.شما نيز مي توانيد تصاويري با مضمون حجم و ساختمان را گرد آورده وخطوط گريزنده ،نقطه گريز و خط افق را بر روي آن ترسيم نماييد.در پرسپکتيو يک نقطه اي و دو نقطه اي ،نقطه گريز بايستي بر روي خط افق باشد ،اما محل قرار گيري آن مي تواند متغير باشد.هر قدر نقطه گريز به حجم اصلي نزديکتر باشد زاويه هاي تند تري بوجود مي آورد و خطوط واضلاع کناره حجم به هم فشرده تر مي شوند و هر قدر نقطه گريز از حجم اصلي دور باشد ،زاويه ها بازتر مي شوند و اضلاع کناره حجم با وسعت بيشتري در فضا گسترش مي يابند.
-----------
") نازلی عزیز این روشی که معرفی کردی اصول کارش چه طوریه؟
نازلی عزیز این روشی که معرفی کردی اصول کارش چه طوریه؟
آخه تو دانشگاه فقط به ما دو روش ترسیم مستقیم و معکوس رو یاد دادن که روش مستقیم خیلی آسونتر از معکوسه و پلان رو 30 - 60 لبه خط زمین میچسبونیم و پرسپکتیو نما میکشیم

معمولاً پرسپکتيو به دو حالت اصلي شناخته مي شود:1_پرسپکتيو فضاي داخلي _مثل فضاي داخل اتاق ،راهرو،ساختمان و...تصوير4 2_پرسپکتيو فضاي خارجي _مثل فضاي خارج از ساختمان ،خيابان،شهر و فضاهاي باز .در اينجا لازم است اشاره کنيم که گاهي نيز طراحان از ترکيب دو حالت فوق استفاده مي کنند .
مشاهده و ترسيم اشيإ با شيوه پرسپکتيو نيز به چند روش صورت مي پذيرد که به طور عمده عبارتند از:پرسپکتيويک نقطه اي ،پرسپکتيودو نقطه اي و پرسپكتيوسه نقطه اي هر يک از موارد فوق شامل قوانيني نسبتاًساده هستند و چنانچه اشکال هندسي را با توجه به قوانين هر يک ترسيم نماييم مي توانيم از تنوع بي شماري که به وجود مي آيد استفاده کنيم.براي ترسيم پرسپکتيو يک شئ لازم است که ابتدا خط افق و نقطه گريز را مشخص کنيد.خط افق :فاصله چشم ناظر از سطح زمين تعيين کننده خط افق است .به عنوان مثال زماني که بر روي صندلي نشسته ايد و ارتفاع يا فاصله چشم شما از سطح زمين 5\1 متر است،خط افق براي شما در همان ارتفاع 5\1 متري واقع شده و به موازات نگاه شما قرار دارد.نقطه گريز:اگر حجم يا شکلي را که در پرسپکتيو قرار گرفته به دقت بررسي کنيد متوجه مي شويد که خطوط و زاويه هايي که دورتر قرار دارند همه به طرف خط افق رفته و در يک نقطه متمرکز مي شوند.به اين خطوط راهنما ،خطوط گريزنده يا خطوط سهمي نيز مي گويند.شما نيز مي توانيد تصاويري با مضمون حجم و ساختمان را گرد آورده وخطوط گريزنده ،نقطه گريز و خط افق را بر روي آن ترسيم نماييد.در پرسپکتيو يک نقطه اي و دو نقطه اي ،نقطه گريز بايستي بر روي خط افق باشد ،اما محل قرار گيري آن مي تواند متغير باشد.هر قدر نقطه گريز به حجم اصلي نزديکتر باشد زاويه هاي تند تري بوجود مي آورد و خطوط واضلاع کناره حجم به هم فشرده تر مي شوند و هر قدر نقطه گريز از حجم اصلي دور باشد ،زاويه ها بازتر مي شوند و اضلاع کناره حجم با وسعت بيشتري در فضا گسترش مي يابند.
-----------
نازلی عزیز این روشی که معرفی کردی اصول کارش چه طوریه؟آخه تو دانشگاه فقط به ما دو روش ترسیم مستقیم و معکوس رو یاد دادن که روش مستقیم خیلی آسونتر از معکوسه و پلان رو 30 - 60 لبه خط زمین میچسبونیم و پرسپکتیو نما میکشیم
آخرین ویرایش:
خانومی
عضو جدید
آموزش پرسپکتيو در 12 درس( درس اوّل )
آموزش پرسپکتيو در 12 درس( درس اوّل )
درس اوّل
 [FONT=verdana,arial,helvetica,geneva][SIZE=+3] [/SIZE][/FONT][FONT=verdana,arial,helvetica,geneva]LESSON ONE - ELEMENTARY PERSPECTIVE[SIZE=-1] [/SIZE][/FONT][FONT=verdana,arial,helvetica,geneva][SIZE=-1]TIME: Allow one hour for this initial lesson - if combined with previous lesson 80min. It is strongly suggested the teacher prepares by completing the lesson sometime before attempting to teach. Particular measurements can then be given to those who need them.[/SIZE][/FONT]
[FONT=verdana,arial,helvetica,geneva]Aim: [SIZE=-1]To introduce the student to the notion of creating a three dimensional vista on a two dimensional plane. This lesson is particularly important as its intent is have the student create a picture of great depth by merely copying the lines the teacher makes on the chalkboard. The aim is to generally promote confidence in the student.[/SIZE][/FONT]
[FONT=verdana,arial,helvetica,geneva]Materials;[SIZE=-1] The sketch pad,
HB pencil, ruler. [/SIZE][/FONT]
[FONT=verdana,arial,helvetica,geneva]We will carry on from the page prepared in the preamble lesson using the ruler and HB pencil ...[/FONT]
[FONT=verdana,arial,helvetica,geneva][SIZE=-1]a) Quarter the page as shown with light lines. Teacher should do this on the chalkboard, then wait for the students to catch up. [/SIZE][/FONT]

[FONT=verdana,arial,helvetica,geneva][SIZE=-1]b) Where the middle line touches the border mark two points - these are called .... RVP and LVP (Right and Left Vanishing Points).[/SIZE][/FONT]

[FONT=verdana,arial,helvetica,geneva][SIZE=-1]c) Approximate the next four light lines as shown - if the students are unsure then give absolute measurements 50mm (2") down - 75mm(3") up from the center.[/SIZE][/FONT]

[FONT=verdana,arial,helvetica,geneva][SIZE=-1]d) Add the verticals as light construction lines. Note to the students that only three types of lines to be made, vertical lines or lines to the right VP or let VP ... there are none other. Again, give measurements if considered necessary. 35mm (1-1/2") right 50mm (2") left of center.[/SIZE][/FONT]

[FONT=verdana,arial,helvetica,geneva][SIZE=-1]e) Construct the next set of verticals to approximate (below) then join the tops to RVP and LVP. [/SIZE][/FONT]

[FONT=verdana,arial,helvetica,geneva][SIZE=-1]f) Firm in the lines shown.[/SIZE][/FONT]

[FONT=verdana,arial,helvetica,geneva][SIZE=-1]g) Do again on the left of the centre as demonstrated. [/SIZE][/FONT]

[FONT=verdana,arial,helvetica,geneva][SIZE=-1]h) Firm in the lines as in my drawing.[/SIZE][/FONT]

[FONT=verdana,arial,helvetica,geneva][SIZE=-1]i) Add another lightly.[/SIZE][/FONT]

[FONT=verdana,arial,helvetica,geneva][SIZE=-1]j) Firm in ... [/SIZE][/FONT]

[FONT=verdana,arial,helvetica,geneva][SIZE=-1]k) and a fifth ...[/SIZE][/FONT]

[FONT=verdana,arial,helvetica,geneva][SIZE=-1]l) Shade the right hand side of the buildings as shown.[/SIZE][/FONT]

[FONT=verdana,arial,helvetica,geneva][SIZE=-1]m) Add some light lines as shown to suggest road and pavement - then firm in when satisfied. Demonstrate how to add some suggestions of windows and signs. Have the children hold up their pads at the completion of a particular time. Those who have never drawn in three dimensions will be encouraged and quite keen to continue. [/SIZE][/FONT]

[FONT=verdana,arial,helvetica,geneva]Home work;[SIZE=-1]
Complete the drawing adding more windows, pedestrians, cars, background or more buildings... encourage innovation.
Press here to go to a master painter's oil painting using two point perspective as shown above. Press back to return.[/SIZE][/FONT]
 [FONT=verdana,arial,helvetica,geneva][SIZE=+1]GO TO ... LESSON TWO[/SIZE][/FONT]
[FONT=verdana,arial,helvetica,geneva][SIZE=-1]lesson menu [/SIZE][/FONT]
</SPAN>


آموزش پرسپکتيو در 12 درس( درس اوّل )
درس اوّل
[FONT=verdana,arial,helvetica,geneva]Aim: [SIZE=-1]To introduce the student to the notion of creating a three dimensional vista on a two dimensional plane. This lesson is particularly important as its intent is have the student create a picture of great depth by merely copying the lines the teacher makes on the chalkboard. The aim is to generally promote confidence in the student.[/SIZE][/FONT]
[FONT=verdana,arial,helvetica,geneva]Materials;[SIZE=-1] The sketch pad,
HB pencil, ruler. [/SIZE][/FONT]
[FONT=verdana,arial,helvetica,geneva]We will carry on from the page prepared in the preamble lesson using the ruler and HB pencil ...[/FONT]
[FONT=verdana,arial,helvetica,geneva][SIZE=-1]a) Quarter the page as shown with light lines. Teacher should do this on the chalkboard, then wait for the students to catch up. [/SIZE][/FONT]
[FONT=verdana,arial,helvetica,geneva][SIZE=-1]b) Where the middle line touches the border mark two points - these are called .... RVP and LVP (Right and Left Vanishing Points).[/SIZE][/FONT]
[FONT=verdana,arial,helvetica,geneva][SIZE=-1]c) Approximate the next four light lines as shown - if the students are unsure then give absolute measurements 50mm (2") down - 75mm(3") up from the center.[/SIZE][/FONT]
[FONT=verdana,arial,helvetica,geneva][SIZE=-1]d) Add the verticals as light construction lines. Note to the students that only three types of lines to be made, vertical lines or lines to the right VP or let VP ... there are none other. Again, give measurements if considered necessary. 35mm (1-1/2") right 50mm (2") left of center.[/SIZE][/FONT]
[FONT=verdana,arial,helvetica,geneva][SIZE=-1]e) Construct the next set of verticals to approximate (below) then join the tops to RVP and LVP. [/SIZE][/FONT]
[FONT=verdana,arial,helvetica,geneva][SIZE=-1]f) Firm in the lines shown.[/SIZE][/FONT]
[FONT=verdana,arial,helvetica,geneva][SIZE=-1]g) Do again on the left of the centre as demonstrated. [/SIZE][/FONT]
[FONT=verdana,arial,helvetica,geneva][SIZE=-1]h) Firm in the lines as in my drawing.[/SIZE][/FONT]
[FONT=verdana,arial,helvetica,geneva][SIZE=-1]i) Add another lightly.[/SIZE][/FONT]
[FONT=verdana,arial,helvetica,geneva][SIZE=-1]j) Firm in ... [/SIZE][/FONT]
[FONT=verdana,arial,helvetica,geneva][SIZE=-1]k) and a fifth ...[/SIZE][/FONT]
[FONT=verdana,arial,helvetica,geneva][SIZE=-1]l) Shade the right hand side of the buildings as shown.[/SIZE][/FONT]
[FONT=verdana,arial,helvetica,geneva][SIZE=-1]m) Add some light lines as shown to suggest road and pavement - then firm in when satisfied. Demonstrate how to add some suggestions of windows and signs. Have the children hold up their pads at the completion of a particular time. Those who have never drawn in three dimensions will be encouraged and quite keen to continue. [/SIZE][/FONT]
[FONT=verdana,arial,helvetica,geneva]Home work;[SIZE=-1]
Complete the drawing adding more windows, pedestrians, cars, background or more buildings... encourage innovation.
Press here to go to a master painter's oil painting using two point perspective as shown above. Press back to return.[/SIZE][/FONT]
[FONT=verdana,arial,helvetica,geneva][SIZE=-1]lesson menu [/SIZE][/FONT]
</SPAN>
خانومی
عضو جدید
آموزش پرسپکتيو در 12 درس( درس دوّم )
آموزش پرسپکتيو در 12 درس( درس دوّم )
درس دوّم ( پرسپکتيوه شهری - به با لا نگاه کردن )
[FONT=verdana,arial,helvetica,geneva][SIZE=+3] [/FONT][FONT=verdana,arial,helvetica,geneva]LESSON - PERSPECTIVE TWO - CITY STREET (UP)[/FONT] [FONT=verdana,arial,helvetica,geneva][SIZE=-1]TIME:
Allow 40min - teacher prepartation: prepare sketch beforehand with measurements.[/SIZE][/FONT]
[FONT=verdana,arial,helvetica,geneva]Aim:
[SIZE=-1]To introduce the student to the notion of creating a three dimensional vista on a two dimensional plane. This lesson follows on and develops the theme of the previous lesson.[/SIZE][/FONT]
[FONT=verdana,arial,helvetica,geneva]Materials:[SIZE=-1]
The sketch pad,
HB pencil, ruler, eraser[/SIZE][/FONT]
[FONT=verdana,arial,helvetica,geneva]Prepare a new page with the margin as in the previous lesson using the ruler and HB pencil ...[/FONT]
[FONT=verdana,arial,helvetica,geneva][SIZE=-1]a) Quarter the page as shown with light lines. Teacher should do this on the chalkboard then wait for the students to catch up. [/SIZE][/FONT]

[FONT=verdana,arial,helvetica,geneva][SIZE=-1]b) In this lesson we are going to use only one vanishing point (CVP) and it is in the certer of the page. Place in the lines approximately as shown. Parallel lines are 20mm (3/4") down and 30mm (1,1/4") up from dead center.[/SIZE][/FONT]

[FONT=verdana,arial,helvetica,geneva][SIZE=-1]c) Firm in the lines shown.[/SIZE][/FONT]

[FONT=verdana,arial,helvetica,geneva][SIZE=-1]d) Add the next two radiating light lines as demonstrated.[/SIZE][/FONT]

[FONT=verdana,arial,helvetica,geneva][SIZE=-1]e) Firm in the next skyscraper - note to the student that all lines in this drawing are either horizontal, vertical or radiate out from the center. There are no others![/SIZE][/FONT]

[FONT=verdana,arial,helvetica,geneva][SIZE=-1]f) Add the next building as shown.[/SIZE][/FONT]

[FONT=verdana,arial,helvetica,geneva][SIZE=-1]g) Some more light construction lines ...[/SIZE][/FONT]

[FONT=verdana,arial,helvetica,geneva][SIZE=-1]h) ... and firm in the lines as shown.[/SIZE][/FONT]

[FONT=verdana,arial,helvetica,geneva][SIZE=-1]i) The essential 'structure' is complete.[/SIZE][/FONT]

[FONT=verdana,arial,helvetica,geneva][SIZE=-1]j) Now for a little shading.[/SIZE][/FONT]

[FONT=verdana,arial,helvetica,geneva][SIZE=-1]Print in the title, add some light lines as shown to suggest windows, then firm in when satisfied. Further shading and details can be completed at home.[/SIZE][/FONT]
[FONT=verdana,arial,helvetica,geneva]Home work;[SIZE=-1]
Complete the drawing adding clouds, birds, more windows etc ... to your satisfaction.[/SIZE][/FONT]
[FONT=verdana,arial,helvetica,geneva][SIZE=+1]GO TO ... LESSON THREE[/SIZE][/FONT]
[FONT=verdana,arial,helvetica,geneva][SIZE=-1]lesson menu [/SIZE][/FONT]
</SPAN>

[/SIZE]
آموزش پرسپکتيو در 12 درس( درس دوّم )
درس دوّم ( پرسپکتيوه شهری - به با لا نگاه کردن )
Allow 40min - teacher prepartation: prepare sketch beforehand with measurements.[/SIZE][/FONT]
[FONT=verdana,arial,helvetica,geneva]Aim:
[SIZE=-1]To introduce the student to the notion of creating a three dimensional vista on a two dimensional plane. This lesson follows on and develops the theme of the previous lesson.[/SIZE][/FONT]
[FONT=verdana,arial,helvetica,geneva]Materials:[SIZE=-1]
The sketch pad,
HB pencil, ruler, eraser[/SIZE][/FONT]
[FONT=verdana,arial,helvetica,geneva]Prepare a new page with the margin as in the previous lesson using the ruler and HB pencil ...[/FONT]
[FONT=verdana,arial,helvetica,geneva][SIZE=-1]a) Quarter the page as shown with light lines. Teacher should do this on the chalkboard then wait for the students to catch up. [/SIZE][/FONT]
[FONT=verdana,arial,helvetica,geneva][SIZE=-1]b) In this lesson we are going to use only one vanishing point (CVP) and it is in the certer of the page. Place in the lines approximately as shown. Parallel lines are 20mm (3/4") down and 30mm (1,1/4") up from dead center.[/SIZE][/FONT]
[FONT=verdana,arial,helvetica,geneva][SIZE=-1]c) Firm in the lines shown.[/SIZE][/FONT]
[FONT=verdana,arial,helvetica,geneva][SIZE=-1]d) Add the next two radiating light lines as demonstrated.[/SIZE][/FONT]
[FONT=verdana,arial,helvetica,geneva][SIZE=-1]e) Firm in the next skyscraper - note to the student that all lines in this drawing are either horizontal, vertical or radiate out from the center. There are no others![/SIZE][/FONT]
[FONT=verdana,arial,helvetica,geneva][SIZE=-1]f) Add the next building as shown.[/SIZE][/FONT]
[FONT=verdana,arial,helvetica,geneva][SIZE=-1]g) Some more light construction lines ...[/SIZE][/FONT]
[FONT=verdana,arial,helvetica,geneva][SIZE=-1]h) ... and firm in the lines as shown.[/SIZE][/FONT]
[FONT=verdana,arial,helvetica,geneva][SIZE=-1]i) The essential 'structure' is complete.[/SIZE][/FONT]
[FONT=verdana,arial,helvetica,geneva][SIZE=-1]j) Now for a little shading.[/SIZE][/FONT]
[FONT=verdana,arial,helvetica,geneva][SIZE=-1]Print in the title, add some light lines as shown to suggest windows, then firm in when satisfied. Further shading and details can be completed at home.[/SIZE][/FONT]
[FONT=verdana,arial,helvetica,geneva]Home work;[SIZE=-1]
Complete the drawing adding clouds, birds, more windows etc ... to your satisfaction.[/SIZE][/FONT]
[FONT=verdana,arial,helvetica,geneva][SIZE=-1]lesson menu [/SIZE][/FONT]
</SPAN>
[/SIZE]
خانومی
عضو جدید
آموزش پرسپکتيو در 12 درس( درس سوّم )
آموزش پرسپکتيو در 12 درس( درس سوّم )
درس سوّم ( پرسپکتيوه شهری - به پا يين نگاه کردن )
[FONT=verdana,arial,helvetica,geneva][SIZE=+3] [/FONT][FONT=verdana,arial,helvetica,geneva]LESSON - PERSPECTIVE THREE - CITY STREET (DOWN)[/FONT] [FONT=verdana,arial,helvetica,geneva][SIZE=-1]TIME: Allow 40min - teacher preparation minimal.[/SIZE][/FONT]
[FONT=verdana,arial,helvetica,geneva]Aim: [SIZE=-1]This lesson follows on and develops the theme of the previous lesson and intends to introduce the notion that views may differ but structural elements of perspective (and drawing) remain very similar.[/SIZE][/FONT]
[FONT=verdana,arial,helvetica,geneva]Materials:[SIZE=-1] The sketch pad,
HB pencil, ruler. [/SIZE][/FONT]
[FONT=verdana,arial,helvetica,geneva]Prepare as in the previous lesson using the ruler and HB pencil[/FONT]
[FONT=verdana,arial,helvetica,geneva][SIZE=-1]a) Quarter the page as shown with diagonal light lines. Teacher should do this on the chalkboard, then wait for the students to catch up. Add the extra light lines. In this lesson we are again going to use only one vanishing point (CVP) and it is in the certer of the page. Place in the lines approximately as shown.[/SIZE][/FONT]

[FONT=verdana,arial,helvetica,geneva][SIZE=-1]b) Add the two extra light lines. [/SIZE][/FONT]

[FONT=verdana,arial,helvetica,geneva][SIZE=-1]c) Firm in the lines shown.[/SIZE][/FONT]

[FONT=verdana,arial,helvetica,geneva][SIZE=-1]d) Add the next series of horizontal light lines and the two extra radiating lines. Give measurements of students are unsure about the position of the horizontal lines as some students become nervous about mistakes - again note to the student that all lines in this drawing are either horizontal, vertical or radiate out from the center.[/SIZE][/FONT]

[FONT=verdana,arial,helvetica,geneva][SIZE=-1]e) Firm in as shown.[/SIZE][/FONT]

[FONT=verdana,arial,helvetica,geneva][SIZE=-1]f) Add the extra. [/SIZE][/FONT]

[FONT=verdana,arial,helvetica,geneva][SIZE=-1]h) Now the vertical lines and the structure begins to take shape.[/SIZE][/FONT]

[FONT=verdana,arial,helvetica,geneva][SIZE=-1]i) The essential 'structure' is done - now two horizontal lines show the pavement edges.[/SIZE][/FONT]

[FONT=verdana,arial,helvetica,geneva][SIZE=-1]j) Now for a little shading.[/SIZE][/FONT]
[FONT=verdana,arial,helvetica,geneva][SIZE=-1]Print in the title add some light lines as shown to suggest windows - then firm in when satisfied. Further shading and details can be completed at home.[/SIZE][/FONT]
[FONT=verdana,arial,helvetica,geneva]Homework:[SIZE=-1] Complete the drawing adding cars, pedestrians, heli-pads, more windows etc ...[/SIZE][/FONT]
[FONT=verdana,arial,helvetica,geneva][SIZE=+1]GO TO ... LESSON FOUR[/SIZE][/FONT]
[FONT=verdana,arial,helvetica,geneva][SIZE=-1]lesson menu [/SIZE][/FONT]
</SPAN>

[/SIZE]
آموزش پرسپکتيو در 12 درس( درس سوّم )
درس سوّم ( پرسپکتيوه شهری - به پا يين نگاه کردن )
[FONT=verdana,arial,helvetica,geneva]Aim: [SIZE=-1]This lesson follows on and develops the theme of the previous lesson and intends to introduce the notion that views may differ but structural elements of perspective (and drawing) remain very similar.[/SIZE][/FONT]
[FONT=verdana,arial,helvetica,geneva]Materials:[SIZE=-1] The sketch pad,
HB pencil, ruler. [/SIZE][/FONT]
[FONT=verdana,arial,helvetica,geneva]Prepare as in the previous lesson using the ruler and HB pencil[/FONT]
[FONT=verdana,arial,helvetica,geneva][SIZE=-1]a) Quarter the page as shown with diagonal light lines. Teacher should do this on the chalkboard, then wait for the students to catch up. Add the extra light lines. In this lesson we are again going to use only one vanishing point (CVP) and it is in the certer of the page. Place in the lines approximately as shown.[/SIZE][/FONT]
[FONT=verdana,arial,helvetica,geneva][SIZE=-1]b) Add the two extra light lines. [/SIZE][/FONT]
[FONT=verdana,arial,helvetica,geneva][SIZE=-1]c) Firm in the lines shown.[/SIZE][/FONT]
[FONT=verdana,arial,helvetica,geneva][SIZE=-1]d) Add the next series of horizontal light lines and the two extra radiating lines. Give measurements of students are unsure about the position of the horizontal lines as some students become nervous about mistakes - again note to the student that all lines in this drawing are either horizontal, vertical or radiate out from the center.[/SIZE][/FONT]
[FONT=verdana,arial,helvetica,geneva][SIZE=-1]e) Firm in as shown.[/SIZE][/FONT]
[FONT=verdana,arial,helvetica,geneva][SIZE=-1]f) Add the extra. [/SIZE][/FONT]
[FONT=verdana,arial,helvetica,geneva][SIZE=-1]h) Now the vertical lines and the structure begins to take shape.[/SIZE][/FONT]
[FONT=verdana,arial,helvetica,geneva][SIZE=-1]i) The essential 'structure' is done - now two horizontal lines show the pavement edges.[/SIZE][/FONT]
[FONT=verdana,arial,helvetica,geneva][SIZE=-1]j) Now for a little shading.[/SIZE][/FONT]
[FONT=verdana,arial,helvetica,geneva][SIZE=-1]Print in the title add some light lines as shown to suggest windows - then firm in when satisfied. Further shading and details can be completed at home.[/SIZE][/FONT]
[FONT=verdana,arial,helvetica,geneva]Homework:[SIZE=-1] Complete the drawing adding cars, pedestrians, heli-pads, more windows etc ...[/SIZE][/FONT]
[FONT=verdana,arial,helvetica,geneva][SIZE=-1]lesson menu [/SIZE][/FONT]
</SPAN>
[/SIZE]
خانومی
عضو جدید
آموزش پرسپکتيو در 12 درس( درس چها رم )
آموزش پرسپکتيو در 12 درس( درس چها رم )
درس چها رم ( زا ويه اطاق )
[FONT=verdana,arial,helvetica,geneva][SIZE=+3] [/FONT][FONT=verdana,arial,helvetica,geneva]LESSON - PERSPECTIVE FOUR - CORNER OF ROOM [/FONT][FONT=verdana,arial,helvetica,geneva][SIZE=-1]TIME:
Allow 40min[/SIZE][/FONT]
[FONT=verdana,arial,helvetica,geneva]Aim:
[SIZE=-1]To create a perspective grid using a single measurement and three vanishing points. This lesson is to introduce the notion of perspective 'scale'. That is, as things of equal size recede they appear smaller. Perspective is a method of logically determining just how much smaller.[/SIZE][/FONT]
[FONT=verdana,arial,helvetica,geneva]Materials:[SIZE=-1]
The sketch pad,
HB pencil, ruler.[/SIZE][/FONT]
[FONT=verdana,arial,helvetica,geneva]Construct margin and title box then:[/FONT]

[FONT=verdana,arial,helvetica,geneva][SIZE=-1]a) Quarter the page as shown with light lines then add the two additional lines as shown.[/SIZE][/FONT]

[FONT=verdana,arial,helvetica,geneva][SIZE=-1]b) Measure a set distance up as shown 30mm (1,1/4") and join to RVP as indicated.[/SIZE][/FONT]

[FONT=verdana,arial,helvetica,geneva][SIZE=-1]c) Where that line intersects the vertical line down from CVP construct light line from LVP as in the drawing.[/SIZE][/FONT]

[FONT=verdana,arial,helvetica,geneva][SIZE=-1]d) Join the two lines to the CVP as shown.[/SIZE][/FONT]

[FONT=verdana,arial,helvetica,geneva][SIZE=-1]e) Add the two extra light lines from LVP and RVP. We have now drawn four squares on the ground. We can now add many more going backwards using the same method of construction.[/SIZE][/FONT]

[FONT=verdana,arial,helvetica,geneva][SIZE=-1]f) We now have 36 squares.[/SIZE][/FONT]

[FONT=verdana,arial,helvetica,geneva][SIZE=-1]g) Shade the alternate squares as shown. Now we have made a floor. At this stage the student needs to be asked:
- Are the squares of 'equal' size?
- Why are the ones at the back smaller then the ones at the front?
- What happens to parallel lines when we draw them in 'perspective'?
- Is this what the eye or the camera sees?[/SIZE][/FONT]
[FONT=verdana,arial,helvetica,geneva][SIZE=-1]Next we shall suggest some walls.[/SIZE][/FONT]

[FONT=verdana,arial,helvetica,geneva][SIZE=-1]h) Add the two extra light lines 40mm (1,1/2") up from dead center[/SIZE][/FONT]

[FONT=verdana,arial,helvetica,geneva][SIZE=-1]i) Firm in the walls. [/SIZE][/FONT]

[FONT=verdana,arial,helvetica,geneva][SIZE=-1]j) Using only vertical lines and lines going to RVP or LVP lightly construct some windows and a door. Ask:
- how could the room be made larger? (answer - lowering the ceiling).[/SIZE][/FONT]

[FONT=verdana,arial,helvetica,geneva][SIZE=-1]k) Firm them in and add a door knob and a little shading on the ceiling. Ask:
- How do we know how high to make the door? (stress the importance of observation and look around the classroom for clues).
Is the door handle on the right or left side of the door?[/SIZE][/FONT]

[FONT=verdana,arial,helvetica,geneva][SIZE=-1]l) I have added some more tiles (see if the student can do this by 'judgement') - an extra row on the right and one on the left - and shaded the door.[/SIZE][/FONT]
[FONT=verdana,arial,helvetica,geneva][SIZE=-1]Clean up and print in the title as shown.
You will find some students will grasp the ideas and concepts faster than others. Instead of having them idle, and waiting, they can be encouraged to add extra detail of their own choosing. That is the beauty of this type of lesson; it is open ended. Encourage the more advanced student to add the more complicated items.[/SIZE][/FONT]
[FONT=verdana,arial,helvetica,geneva]Home work:[SIZE=-1]
Complete the drawing adding a painting on the wall, curtains, light on the ceiling, a chair or table ... etc.[/SIZE][/FONT]
[FONT=verdana,arial,helvetica,geneva][SIZE=+1]GO TO ... LESSON FIVE[/SIZE][/FONT] [FONT=verdana,arial,helvetica,geneva][SIZE=-1]lesson menu [/SIZE][/FONT]
</SPAN>


[/SIZE]
آموزش پرسپکتيو در 12 درس( درس چها رم )
درس چها رم ( زا ويه اطاق )
Allow 40min[/SIZE][/FONT]
[FONT=verdana,arial,helvetica,geneva]Aim:
[SIZE=-1]To create a perspective grid using a single measurement and three vanishing points. This lesson is to introduce the notion of perspective 'scale'. That is, as things of equal size recede they appear smaller. Perspective is a method of logically determining just how much smaller.[/SIZE][/FONT]
[FONT=verdana,arial,helvetica,geneva]Materials:[SIZE=-1]
The sketch pad,
HB pencil, ruler.[/SIZE][/FONT]
[FONT=verdana,arial,helvetica,geneva]Construct margin and title box then:[/FONT]
[FONT=verdana,arial,helvetica,geneva][SIZE=-1]a) Quarter the page as shown with light lines then add the two additional lines as shown.[/SIZE][/FONT]
[FONT=verdana,arial,helvetica,geneva][SIZE=-1]b) Measure a set distance up as shown 30mm (1,1/4") and join to RVP as indicated.[/SIZE][/FONT]
[FONT=verdana,arial,helvetica,geneva][SIZE=-1]c) Where that line intersects the vertical line down from CVP construct light line from LVP as in the drawing.[/SIZE][/FONT]
[FONT=verdana,arial,helvetica,geneva][SIZE=-1]d) Join the two lines to the CVP as shown.[/SIZE][/FONT]
[FONT=verdana,arial,helvetica,geneva][SIZE=-1]e) Add the two extra light lines from LVP and RVP. We have now drawn four squares on the ground. We can now add many more going backwards using the same method of construction.[/SIZE][/FONT]
[FONT=verdana,arial,helvetica,geneva][SIZE=-1]f) We now have 36 squares.[/SIZE][/FONT]
[FONT=verdana,arial,helvetica,geneva][SIZE=-1]g) Shade the alternate squares as shown. Now we have made a floor. At this stage the student needs to be asked:
- Are the squares of 'equal' size?
- Why are the ones at the back smaller then the ones at the front?
- What happens to parallel lines when we draw them in 'perspective'?
- Is this what the eye or the camera sees?[/SIZE][/FONT]
[FONT=verdana,arial,helvetica,geneva][SIZE=-1]Next we shall suggest some walls.[/SIZE][/FONT]
[FONT=verdana,arial,helvetica,geneva][SIZE=-1]h) Add the two extra light lines 40mm (1,1/2") up from dead center[/SIZE][/FONT]
[FONT=verdana,arial,helvetica,geneva][SIZE=-1]i) Firm in the walls. [/SIZE][/FONT]
[FONT=verdana,arial,helvetica,geneva][SIZE=-1]j) Using only vertical lines and lines going to RVP or LVP lightly construct some windows and a door. Ask:
- how could the room be made larger? (answer - lowering the ceiling).[/SIZE][/FONT]
[FONT=verdana,arial,helvetica,geneva][SIZE=-1]k) Firm them in and add a door knob and a little shading on the ceiling. Ask:
- How do we know how high to make the door? (stress the importance of observation and look around the classroom for clues).
Is the door handle on the right or left side of the door?[/SIZE][/FONT]
[FONT=verdana,arial,helvetica,geneva][SIZE=-1]l) I have added some more tiles (see if the student can do this by 'judgement') - an extra row on the right and one on the left - and shaded the door.[/SIZE][/FONT]
[FONT=verdana,arial,helvetica,geneva][SIZE=-1]Clean up and print in the title as shown.
You will find some students will grasp the ideas and concepts faster than others. Instead of having them idle, and waiting, they can be encouraged to add extra detail of their own choosing. That is the beauty of this type of lesson; it is open ended. Encourage the more advanced student to add the more complicated items.[/SIZE][/FONT]
[FONT=verdana,arial,helvetica,geneva]Home work:[SIZE=-1]
Complete the drawing adding a painting on the wall, curtains, light on the ceiling, a chair or table ... etc.[/SIZE][/FONT]
</SPAN>
[/SIZE]
خانومی
عضو جدید
آموزش پرسپکتيو در 12 درس( درس پنجم)
آموزش پرسپکتيو در 12 درس( درس پنجم)
درس پنجم ( ريل ها در پرسپکتيوه )
[FONT=verdana,arial,helvetica,geneva][SIZE=+3] [/FONT][FONT=verdana,arial,helvetica,geneva]LESSON - PERSPECTIVE FIVE - WESTERN RAILWAY[/FONT] [FONT=verdana,arial,helvetica,geneva][SIZE=-1]TIME:
Allow 40min[/SIZE][/FONT]
[FONT=verdana,arial,helvetica,geneva]Aim:
[SIZE=-1]To create a perspective grid using a single measurement and three vanishing points. This lesson is to consolidate and further the notion of perspective 'scale'. That is, as things of equal size recede they appear smaller. This time we will use the CVP and a familiar and logical structure, a railway line.[/SIZE][/FONT]
[FONT=verdana,arial,helvetica,geneva]Materials:[SIZE=-1]
The sketch pad,
HB pencil, ruler.[/SIZE][/FONT]
[FONT=verdana,arial,helvetica,geneva]Construct margin and title box then:[/FONT]

[FONT=verdana,arial,helvetica,geneva][SIZE=-1]a) Construct the same light lines as in stage a, b, c, d, of the previous lesson until we get the lines shown above.[/SIZE][/FONT]

[FONT=verdana,arial,helvetica,geneva][SIZE=-1]b) This time we firm in the 'diagonals' which become railway line 'sleepers'. Notice here we use a more simplified method of construction.[/SIZE][/FONT]

[FONT=verdana,arial,helvetica,geneva][SIZE=-1]c) Keep adding sleepers.[/SIZE][/FONT]

[FONT=verdana,arial,helvetica,geneva][SIZE=-1]d) After the student has completed the drawing to the stage above ask:
What shall we call the line that joins LVP, RVP and CVP? (answer 'horizon line').
How wide are railway tracks? (remember the old movies of people tied to railway lines? - answer about 5feet).
If the distance between the sleepers is 5 feet what is the distance between the second add fourth sleepers?[/SIZE][/FONT]

[FONT=verdana,arial,helvetica,geneva][SIZE=-1]e) Add the extra light lines on the ground (two horizontal and three to the CVP). We are going to build a station about 30mm (1,1/4") from track 60mm wide. [/SIZE][/FONT]

[FONT=verdana,arial,helvetica,geneva][SIZE=-1]f) Add the vertical lines 50mm (2") high and join to CVP[/SIZE][/FONT]

[FONT=verdana,arial,helvetica,geneva][SIZE=-1]g) Firm in the lines as shown and ask:
How high is the building? The student should measure the width of the tracks on the line directly opposite the front edge of the station and apply that 'scale' to the building's height. Objects an equal distance away from the 'observer' are subject to the same measurements of 'scale ' at that distance. In this drawing the scale is discovered by knowing the width of the track at that distance.[/SIZE][/FONT]

[FONT=verdana,arial,helvetica,geneva][SIZE=-1]h) Add the telegraph lines and poles and have the student determine their height and distance apart.[/SIZE][/FONT]
[FONT=verdana,arial,helvetica,geneva][SIZE=-1]Clean up and print in the title as shown.
Encourage the advanced students to add three 12 foot cacti at various locations in the landscape.[/SIZE][/FONT]
[FONT=verdana,arial,helvetica,geneva]Home work:[SIZE=-1]
Complete the drawing adding a roof on the station, cactus, hills , train, and birds etc.
Press here to see a master work using the CVP (central vanishing point) perspective.[/SIZE][/FONT]
[FONT=verdana,arial,helvetica,geneva][SIZE=+1]GO TO ... LESSON SIX[/SIZE][/FONT] [FONT=verdana,arial,helvetica,geneva][SIZE=-1]lesson menu [/SIZE][/FONT]
</SPAN>


[/SIZE]
آموزش پرسپکتيو در 12 درس( درس پنجم)
درس پنجم ( ريل ها در پرسپکتيوه )
Allow 40min[/SIZE][/FONT]
[FONT=verdana,arial,helvetica,geneva]Aim:
[SIZE=-1]To create a perspective grid using a single measurement and three vanishing points. This lesson is to consolidate and further the notion of perspective 'scale'. That is, as things of equal size recede they appear smaller. This time we will use the CVP and a familiar and logical structure, a railway line.[/SIZE][/FONT]
[FONT=verdana,arial,helvetica,geneva]Materials:[SIZE=-1]
The sketch pad,
HB pencil, ruler.[/SIZE][/FONT]
[FONT=verdana,arial,helvetica,geneva]Construct margin and title box then:[/FONT]
[FONT=verdana,arial,helvetica,geneva][SIZE=-1]a) Construct the same light lines as in stage a, b, c, d, of the previous lesson until we get the lines shown above.[/SIZE][/FONT]
[FONT=verdana,arial,helvetica,geneva][SIZE=-1]b) This time we firm in the 'diagonals' which become railway line 'sleepers'. Notice here we use a more simplified method of construction.[/SIZE][/FONT]
[FONT=verdana,arial,helvetica,geneva][SIZE=-1]c) Keep adding sleepers.[/SIZE][/FONT]
[FONT=verdana,arial,helvetica,geneva][SIZE=-1]d) After the student has completed the drawing to the stage above ask:
What shall we call the line that joins LVP, RVP and CVP? (answer 'horizon line').
How wide are railway tracks? (remember the old movies of people tied to railway lines? - answer about 5feet).
If the distance between the sleepers is 5 feet what is the distance between the second add fourth sleepers?[/SIZE][/FONT]
[FONT=verdana,arial,helvetica,geneva][SIZE=-1]e) Add the extra light lines on the ground (two horizontal and three to the CVP). We are going to build a station about 30mm (1,1/4") from track 60mm wide. [/SIZE][/FONT]
[FONT=verdana,arial,helvetica,geneva][SIZE=-1]f) Add the vertical lines 50mm (2") high and join to CVP[/SIZE][/FONT]
[FONT=verdana,arial,helvetica,geneva][SIZE=-1]g) Firm in the lines as shown and ask:
How high is the building? The student should measure the width of the tracks on the line directly opposite the front edge of the station and apply that 'scale' to the building's height. Objects an equal distance away from the 'observer' are subject to the same measurements of 'scale ' at that distance. In this drawing the scale is discovered by knowing the width of the track at that distance.[/SIZE][/FONT]
[FONT=verdana,arial,helvetica,geneva][SIZE=-1]h) Add the telegraph lines and poles and have the student determine their height and distance apart.[/SIZE][/FONT]
[FONT=verdana,arial,helvetica,geneva][SIZE=-1]Clean up and print in the title as shown.
Encourage the advanced students to add three 12 foot cacti at various locations in the landscape.[/SIZE][/FONT]
[FONT=verdana,arial,helvetica,geneva]Home work:[SIZE=-1]
Complete the drawing adding a roof on the station, cactus, hills , train, and birds etc.
Press here to see a master work using the CVP (central vanishing point) perspective.[/SIZE][/FONT]
</SPAN>
[/SIZE]
خانومی
عضو جدید
آموزش پرسپکتيو در 12 درس( درس پنجم)
آموزش پرسپکتيو در 12 درس( درس پنجم)
درس ششم الف (دکر اطاق 1)
[FONT=verdana,arial,helvetica,geneva][SIZE=+3] [/FONT][FONT=verdana,arial,helvetica,geneva]LESSON - PERSPECTIVE SIX- ROOM INTERIOR (CVP)[/FONT] [FONT=verdana,arial,helvetica,geneva][SIZE=-1]TIME:
Allow 60-80min - this is a double lesson[/SIZE][/FONT]
[FONT=verdana,arial,helvetica,geneva]Aim:
[SIZE=-1]To create a perspective grid using a single measurement and three vanishing points but vanishing toward the CVP. We will also introduce the freehand method of constructing curves.[/SIZE][/FONT]
[FONT=verdana,arial,helvetica,geneva]Materials:[SIZE=-1]
The sketch pad,
HB pencil, ruler.[/SIZE][/FONT]
[FONT=verdana,arial,helvetica,geneva]Construct margin and title box then:[/FONT]

[FONT=verdana,arial,helvetica,geneva][SIZE=-1]a) Measure intervals of 24mm (1") along the base margin as shown and join to RVP.[/SIZE][/FONT]

[FONT=verdana,arial,helvetica,geneva][SIZE=-1]b) Where they cross the vertical line from CVP draw horizontal lines as above.[/SIZE][/FONT]

[FONT=verdana,arial,helvetica,geneva][SIZE=-1]c) Add lines to CVP from marked intervals[/SIZE][/FONT]

[FONT=verdana,arial,helvetica,geneva][SIZE=-1]d) Extend and complete.[/SIZE][/FONT]

[FONT=verdana,arial,helvetica,geneva][SIZE=-1]e) Shade alternate tiles.[/SIZE][/FONT]

[FONT=verdana,arial,helvetica,geneva][SIZE=-1]f) Add two more rows to the outside.[/SIZE][/FONT]

[FONT=verdana,arial,helvetica,geneva][SIZE=-1]g) Clean up with eraser if necessary.[/SIZE][/FONT]
[FONT=verdana,arial,helvetica,geneva][SIZE=-1]Revise ask:
What does RVP stand for?
What is the horizon?
How is it we can make a drawing with depth on a flat surface?[/SIZE][/FONT]
[FONT=verdana,arial,helvetica,geneva]EXPLAIN :
[SIZE=-1]The 'flat' surface is like a window or a sheet of glass. It is called a 'picture plane' (PP). The 'observer', the person looking is standing a distance behind the PP and the floor is a particular distance in front of the PP.[/SIZE][/FONT]
[FONT=verdana,arial,helvetica,geneva][SIZE=-1]At this point we need to interrupt our drawing to learn to draw circles. Since we have no tools to trace or guide us we will need to learn to draw these - freehand. We need to know this to complete our current project. So start a new sheet and ...[/SIZE][/FONT]
[FONT=verdana,arial,helvetica,geneva][SIZE=+1]GO TO ... LESSON SIX 'B'[/SIZE][/FONT]
[FONT=verdana,arial,helvetica,geneva][SIZE=-1]lesson menu [/SIZE][/FONT]
</SPAN>


[/SIZE]
آموزش پرسپکتيو در 12 درس( درس پنجم)
درس ششم الف (دکر اطاق 1)
Allow 60-80min - this is a double lesson[/SIZE][/FONT]
[FONT=verdana,arial,helvetica,geneva]Aim:
[SIZE=-1]To create a perspective grid using a single measurement and three vanishing points but vanishing toward the CVP. We will also introduce the freehand method of constructing curves.[/SIZE][/FONT]
[FONT=verdana,arial,helvetica,geneva]Materials:[SIZE=-1]
The sketch pad,
HB pencil, ruler.[/SIZE][/FONT]
[FONT=verdana,arial,helvetica,geneva]Construct margin and title box then:[/FONT]
[FONT=verdana,arial,helvetica,geneva][SIZE=-1]a) Measure intervals of 24mm (1") along the base margin as shown and join to RVP.[/SIZE][/FONT]
[FONT=verdana,arial,helvetica,geneva][SIZE=-1]b) Where they cross the vertical line from CVP draw horizontal lines as above.[/SIZE][/FONT]
[FONT=verdana,arial,helvetica,geneva][SIZE=-1]c) Add lines to CVP from marked intervals[/SIZE][/FONT]
[FONT=verdana,arial,helvetica,geneva][SIZE=-1]d) Extend and complete.[/SIZE][/FONT]
[FONT=verdana,arial,helvetica,geneva][SIZE=-1]e) Shade alternate tiles.[/SIZE][/FONT]
[FONT=verdana,arial,helvetica,geneva][SIZE=-1]f) Add two more rows to the outside.[/SIZE][/FONT]
[FONT=verdana,arial,helvetica,geneva][SIZE=-1]g) Clean up with eraser if necessary.[/SIZE][/FONT]
[FONT=verdana,arial,helvetica,geneva][SIZE=-1]Revise ask:
What does RVP stand for?
What is the horizon?
How is it we can make a drawing with depth on a flat surface?[/SIZE][/FONT]
[FONT=verdana,arial,helvetica,geneva]EXPLAIN :
[SIZE=-1]The 'flat' surface is like a window or a sheet of glass. It is called a 'picture plane' (PP). The 'observer', the person looking is standing a distance behind the PP and the floor is a particular distance in front of the PP.[/SIZE][/FONT]
[FONT=verdana,arial,helvetica,geneva][SIZE=-1]At this point we need to interrupt our drawing to learn to draw circles. Since we have no tools to trace or guide us we will need to learn to draw these - freehand. We need to know this to complete our current project. So start a new sheet and ...[/SIZE][/FONT]
[FONT=verdana,arial,helvetica,geneva][SIZE=-1]lesson menu [/SIZE][/FONT]
</SPAN>
[/SIZE]
خانومی
عضو جدید
آموزش پرسپکتيو در 12 درس( درس ششم 2 ) قبلی درس ششم الف هست اشتباه تا يپ کردم
آموزش پرسپکتيو در 12 درس( درس ششم 2 ) قبلی درس ششم الف هست اشتباه تا يپ کردم
درس ششم 2 (دکر اطاق 2)
[FONT=verdana,arial,helvetica,geneva][SIZE=+3] [/FONT][FONT=verdana,arial,helvetica,geneva]LESSON - PERSPECTIVE SIX- ROOM INTERIOR (CVP)[/FONT] [FONT=verdana,arial,helvetica,geneva][SIZE=-1]TIME:
Allow 60-80min - this is the second part of the double lesson[/SIZE][/FONT]
[FONT=verdana,arial,helvetica,geneva]Aim:
[SIZE=-1]To introduce the freehand method and techinque for the construction of curves and use this to complete our room interior.[/SIZE][/FONT]
[FONT=verdana,arial,helvetica,geneva]Materials:[SIZE=-1]
The sketch pad,
HB pencil, ruler.[/SIZE][/FONT]
[FONT=verdana,arial,helvetica,geneva]Construct margin and title box on a new page then:[/FONT]

[FONT=verdana,arial,helvetica,geneva][SIZE=-1]a) Construct a 75mm (3") square as shown[/SIZE][/FONT]

[FONT=verdana,arial,helvetica,geneva][SIZE=-1]b) Draw the diagonal a-b and without measurement divide into four equal parts. [/SIZE][/FONT]

[FONT=verdana,arial,helvetica,geneva][SIZE=-1]c) Draw a 45 degree tangent through the 3/4 division as shown and lightly sketch the freehand curve. The curve actually cuts the diagonal just below the three quarter mark and above the two thirds point. The students should be encouraged to draw the curve so it 'looks right.'[/SIZE][/FONT]

[FONT=verdana,arial,helvetica,geneva][SIZE=-1]d) When drawing the curve keep the hand on the inside of the curve. This may necessitate keeping the hand still and moving the paper as demonstrated above.[/SIZE][/FONT]

[FONT=verdana,arial,helvetica,geneva][SIZE=-1]e) Construct the square as shown and turn the page upside down to sketch the opposite curve.[/SIZE][/FONT]

[FONT=verdana,arial,helvetica,geneva][SIZE=-1]f) Complete the whole circle lightly and make adjustments where necessary.[/SIZE][/FONT]

[FONT=verdana,arial,helvetica,geneva][SIZE=-1]g) Practice circles of differing sizes, label and turn back to interior of room. For homework the student can practice two or three more.[/SIZE][/FONT]
[FONT=verdana,arial,helvetica,geneva][SIZE=-1]Return to previous page of room interior ...[/SIZE][/FONT]

[FONT=verdana,arial,helvetica,geneva][SIZE=-1]h) Using the method recently learnt construct the three arched portals and firm them in. [/SIZE][/FONT]

[FONT=verdana,arial,helvetica,geneva][SIZE=-1]i) Draw a light rectangle around the portals to make a wall and firm in. Using light lines from the CVP draw the ceiling[/SIZE][/FONT]
[FONT=verdana,arial,helvetica,geneva][SIZE=-1]Revise ask: What does PP stand for?[/SIZE][/FONT]
[FONT=verdana,arial,helvetica,geneva]Home study : [SIZE=-1]Find a picture or photograph form a magazine or elsewhere (it can be a seascape, landscape or whatever) where the horizin can placed in its right position on the CVP. Cut out and paste on the drawing as shown below. If the student so desires they can draw in a little scene themsleves.[/SIZE][/FONT]

[FONT=verdana,arial,helvetica,geneva][SIZE=-1]I have used part of a 'masterpiece' by a well known, if slightly erratic and unreliable, individual.[/SIZE][/FONT]

[FONT=verdana,arial,helvetica,geneva][SIZE=-1]Finally the students can shade the walls, add a painting or two, a side door, etc. The teacher will find it is useful to balance the dicipline of the method with the freedom to work within. Press here to see a room interior using the same method of construction by Michelangelo.[/SIZE][/FONT]
[FONT=verdana,arial,helvetica,geneva][SIZE=+1]GO TO ... LESSON SEVEN[/SIZE][/FONT]
[FONT=verdana,arial,helvetica,geneva][SIZE=-1]lesson menu [/SIZE][/FONT]
</SPAN>


[/SIZE]
آموزش پرسپکتيو در 12 درس( درس ششم 2 ) قبلی درس ششم الف هست اشتباه تا يپ کردم
درس ششم 2 (دکر اطاق 2)
Allow 60-80min - this is the second part of the double lesson[/SIZE][/FONT]
[FONT=verdana,arial,helvetica,geneva]Aim:
[SIZE=-1]To introduce the freehand method and techinque for the construction of curves and use this to complete our room interior.[/SIZE][/FONT]
[FONT=verdana,arial,helvetica,geneva]Materials:[SIZE=-1]
The sketch pad,
HB pencil, ruler.[/SIZE][/FONT]
[FONT=verdana,arial,helvetica,geneva]Construct margin and title box on a new page then:[/FONT]
[FONT=verdana,arial,helvetica,geneva][SIZE=-1]a) Construct a 75mm (3") square as shown[/SIZE][/FONT]
[FONT=verdana,arial,helvetica,geneva][SIZE=-1]b) Draw the diagonal a-b and without measurement divide into four equal parts. [/SIZE][/FONT]
[FONT=verdana,arial,helvetica,geneva][SIZE=-1]c) Draw a 45 degree tangent through the 3/4 division as shown and lightly sketch the freehand curve. The curve actually cuts the diagonal just below the three quarter mark and above the two thirds point. The students should be encouraged to draw the curve so it 'looks right.'[/SIZE][/FONT]
[FONT=verdana,arial,helvetica,geneva][SIZE=-1]d) When drawing the curve keep the hand on the inside of the curve. This may necessitate keeping the hand still and moving the paper as demonstrated above.[/SIZE][/FONT]
[FONT=verdana,arial,helvetica,geneva][SIZE=-1]e) Construct the square as shown and turn the page upside down to sketch the opposite curve.[/SIZE][/FONT]
[FONT=verdana,arial,helvetica,geneva][SIZE=-1]f) Complete the whole circle lightly and make adjustments where necessary.[/SIZE][/FONT]
[FONT=verdana,arial,helvetica,geneva][SIZE=-1]g) Practice circles of differing sizes, label and turn back to interior of room. For homework the student can practice two or three more.[/SIZE][/FONT]
[FONT=verdana,arial,helvetica,geneva][SIZE=-1]Return to previous page of room interior ...[/SIZE][/FONT]
[FONT=verdana,arial,helvetica,geneva][SIZE=-1]h) Using the method recently learnt construct the three arched portals and firm them in. [/SIZE][/FONT]
[FONT=verdana,arial,helvetica,geneva][SIZE=-1]i) Draw a light rectangle around the portals to make a wall and firm in. Using light lines from the CVP draw the ceiling[/SIZE][/FONT]
[FONT=verdana,arial,helvetica,geneva][SIZE=-1]Revise ask: What does PP stand for?[/SIZE][/FONT]
[FONT=verdana,arial,helvetica,geneva]Home study : [SIZE=-1]Find a picture or photograph form a magazine or elsewhere (it can be a seascape, landscape or whatever) where the horizin can placed in its right position on the CVP. Cut out and paste on the drawing as shown below. If the student so desires they can draw in a little scene themsleves.[/SIZE][/FONT]
[FONT=verdana,arial,helvetica,geneva][SIZE=-1]I have used part of a 'masterpiece' by a well known, if slightly erratic and unreliable, individual.[/SIZE][/FONT]
[FONT=verdana,arial,helvetica,geneva][SIZE=-1]Finally the students can shade the walls, add a painting or two, a side door, etc. The teacher will find it is useful to balance the dicipline of the method with the freedom to work within. Press here to see a room interior using the same method of construction by Michelangelo.[/SIZE][/FONT]
[FONT=verdana,arial,helvetica,geneva][SIZE=-1]lesson menu [/SIZE][/FONT]
</SPAN>
[/SIZE]
خانومی
عضو جدید
آموزش پرسپکتيو در 12 درس ( درس هفتم )
آموزش پرسپکتيو در 12 درس ( درس هفتم )
درس هفتم (هرفها در پرسپکتيو)
[FONT=verdana,arial,helvetica,geneva][SIZE=+3] [/FONT][FONT=verdana,arial,helvetica,geneva]LESSON - PERSPECTIVE SEVEN - LETTERS[/FONT] [FONT=verdana,arial,helvetica,geneva][SIZE=-1]TIME: Allow 40 min[/SIZE][/FONT]
[FONT=verdana,arial,helvetica,geneva]Aim: [SIZE=-1]To introduce the freehand method and techinque for the construction of curves and use this to complete a drawing. To introduce the notion that drawing and estimating proportion require judgements that need to be recoqnized, trusted and developed.[/SIZE][/FONT]
[FONT=verdana,arial,helvetica,geneva]Materials:[SIZE=-1] The sketch pad, HB pencil, ruler.[/SIZE][/FONT]
[FONT=verdana,arial,helvetica,geneva]To Begin: (allow 10 min) [SIZE=-1](Preparation - download the first diagram below, print and make a copy for all students) Hand them out and ask:
a) Which is the longest edge in Fig 1 and why? (AD because it is closest - CA and AB recede)
b) What are the circumstances that would make CA=CB? (if the block was centerally positioned between the LVP and RVP)
c) Why is CA bigger than AB in Fig 2?
d) Measure all lines in Fig 2. Are any two the some size? (Discuss what we mean by real size or apparent size?)
e) Fig 3 does not look quite as 'square' as it should, why is that? (AB and CA are slightly to long making the block appear squatter than the others) [/SIZE][/FONT]

[FONT=verdana,arial,helvetica,geneva][SIZE=-1]We must learn to use our eyes and judge distances and proportions. We must keep drawing them until they look right. It is the same if drawing a face or a box for aways we must judge one thing in relation to all the others in the same space. The simplest object to practice and draw is the cube and we can use the cube to make many other shapes. If the cube is nearer the RVP AC will always be larger than AB while the reverse applies for the LVP.[/SIZE][/FONT]
[FONT=verdana,arial,helvetica,geneva]Construct margin and title box on a new page then:[/FONT]

[FONT=verdana,arial,helvetica,geneva][SIZE=-1]b) Draw a cube in the approximate size and position as shown above.[/SIZE][/FONT]

[FONT=verdana,arial,helvetica,geneva][SIZE=-1]c) Extend the line 'ab' to four times its length.[/SIZE][/FONT]

[FONT=verdana,arial,helvetica,geneva][SIZE=-1]d) Draw the diagonal ... extend it, and form the square.[/SIZE][/FONT]

[FONT=verdana,arial,helvetica,geneva][SIZE=-1]e) Construct diagonal and the 16 little boxes as shown[/SIZE][/FONT]

[FONT=verdana,arial,helvetica,geneva][SIZE=-1]f) Mark approximately 3/4 lengths along the diagonals[/SIZE][/FONT]

[FONT=verdana,arial,helvetica,geneva][SIZE=-1]g) Lightly draw in your circle.[/SIZE][/FONT]

[FONT=verdana,arial,helvetica,geneva][SIZE=-1]h) Firm it in. [/SIZE][/FONT]

[FONT=verdana,arial,helvetica,geneva][SIZE=-1]i) Give the disc thickness as shown. The lines to the RVP form 'tangents' to the circle. Sketch in lightly until it looks right then firm it in. The teacher should check ...[/SIZE][/FONT]

[FONT=verdana,arial,helvetica,geneva][SIZE=-1]j) In the inner four squares draw another circle.[/SIZE][/FONT]

[FONT=verdana,arial,helvetica,geneva][SIZE=-1]k) Firm it in and complete as shown above. [/SIZE][/FONT]

[FONT=verdana,arial,helvetica,geneva]Home study :
[SIZE=-1]Shade the drawing and add another letter. There are thousands of variations of this drawing. The student could perhaps try and draw their own initials in the other direction, or using just the CVP on the ground. The more confident can try and draw a large 'S' for instance as homework or a specal project.[/SIZE][/FONT]
[FONT=verdana,arial,helvetica,geneva][SIZE=+1]GO TO ... LESSON EIGHT[/SIZE][/FONT]
[FONT=verdana,arial,helvetica,geneva][SIZE=-1]lesson menu [/SIZE][/FONT]
</SPAN>


[/SIZE]
آموزش پرسپکتيو در 12 درس ( درس هفتم )
درس هفتم (هرفها در پرسپکتيو)
[FONT=verdana,arial,helvetica,geneva]Aim: [SIZE=-1]To introduce the freehand method and techinque for the construction of curves and use this to complete a drawing. To introduce the notion that drawing and estimating proportion require judgements that need to be recoqnized, trusted and developed.[/SIZE][/FONT]
[FONT=verdana,arial,helvetica,geneva]Materials:[SIZE=-1] The sketch pad, HB pencil, ruler.[/SIZE][/FONT]
[FONT=verdana,arial,helvetica,geneva]To Begin: (allow 10 min) [SIZE=-1](Preparation - download the first diagram below, print and make a copy for all students) Hand them out and ask:
a) Which is the longest edge in Fig 1 and why? (AD because it is closest - CA and AB recede)
b) What are the circumstances that would make CA=CB? (if the block was centerally positioned between the LVP and RVP)
c) Why is CA bigger than AB in Fig 2?
d) Measure all lines in Fig 2. Are any two the some size? (Discuss what we mean by real size or apparent size?)
e) Fig 3 does not look quite as 'square' as it should, why is that? (AB and CA are slightly to long making the block appear squatter than the others) [/SIZE][/FONT]
[FONT=verdana,arial,helvetica,geneva][SIZE=-1]We must learn to use our eyes and judge distances and proportions. We must keep drawing them until they look right. It is the same if drawing a face or a box for aways we must judge one thing in relation to all the others in the same space. The simplest object to practice and draw is the cube and we can use the cube to make many other shapes. If the cube is nearer the RVP AC will always be larger than AB while the reverse applies for the LVP.[/SIZE][/FONT]
[FONT=verdana,arial,helvetica,geneva]Construct margin and title box on a new page then:[/FONT]
[FONT=verdana,arial,helvetica,geneva][SIZE=-1]b) Draw a cube in the approximate size and position as shown above.[/SIZE][/FONT]
[FONT=verdana,arial,helvetica,geneva][SIZE=-1]c) Extend the line 'ab' to four times its length.[/SIZE][/FONT]
[FONT=verdana,arial,helvetica,geneva][SIZE=-1]d) Draw the diagonal ... extend it, and form the square.[/SIZE][/FONT]
[FONT=verdana,arial,helvetica,geneva][SIZE=-1]e) Construct diagonal and the 16 little boxes as shown[/SIZE][/FONT]
[FONT=verdana,arial,helvetica,geneva][SIZE=-1]f) Mark approximately 3/4 lengths along the diagonals[/SIZE][/FONT]
[FONT=verdana,arial,helvetica,geneva][SIZE=-1]g) Lightly draw in your circle.[/SIZE][/FONT]
[FONT=verdana,arial,helvetica,geneva][SIZE=-1]h) Firm it in. [/SIZE][/FONT]
[FONT=verdana,arial,helvetica,geneva][SIZE=-1]i) Give the disc thickness as shown. The lines to the RVP form 'tangents' to the circle. Sketch in lightly until it looks right then firm it in. The teacher should check ...[/SIZE][/FONT]
[FONT=verdana,arial,helvetica,geneva][SIZE=-1]j) In the inner four squares draw another circle.[/SIZE][/FONT]
[FONT=verdana,arial,helvetica,geneva][SIZE=-1]k) Firm it in and complete as shown above. [/SIZE][/FONT]
[FONT=verdana,arial,helvetica,geneva]Home study :
[SIZE=-1]Shade the drawing and add another letter. There are thousands of variations of this drawing. The student could perhaps try and draw their own initials in the other direction, or using just the CVP on the ground. The more confident can try and draw a large 'S' for instance as homework or a specal project.[/SIZE][/FONT]
[FONT=verdana,arial,helvetica,geneva][SIZE=-1]lesson menu [/SIZE][/FONT]
</SPAN>
[/SIZE]
خانومی
عضو جدید
آموزش پرسپکتيو در 12 درس ( درس هشتم )
آموزش پرسپکتيو در 12 درس ( درس هشتم )
(سا يه 1)
[FONT=verdana,arial,helvetica,geneva][SIZE=+3] [/FONT][FONT=verdana,arial,helvetica,geneva]LESSON - PERSPECTIVE EIGHT - BASIC SHADOWS [/FONT][FONT=verdana,arial,helvetica,geneva][SIZE=-1]TIME:
Allow 40 min[/SIZE][/FONT]
[FONT=verdana,arial,helvetica,geneva]Aim:
[SIZE=-1]To learn how to plot shadows[/SIZE][/FONT]
[FONT=verdana,arial,helvetica,geneva]Materials:[SIZE=-1]
The sketch pad,
HB pencil, ruler.[/SIZE][/FONT]
[FONT=verdana,arial,helvetica,geneva]To To begin revise: [SIZE=-1]We must learn to use our eyes and judge distances and proportions and keep drawing them until they look right. It is the same if we are drawing a face or a box, we must judge one thing in relation to all the others in the same space. [/SIZE][/FONT]
[FONT=verdana,arial,helvetica,geneva]Construct margin and title box on a new page then:[/FONT]

[FONT=verdana,arial,helvetica,geneva][SIZE=-1]b) As in lesson six construct the grid as shown but start from slightly above the title box.[/SIZE][/FONT]

[FONT=verdana,arial,helvetica,geneva][SIZE=-1]c) Note the RVP is moved slightly toward the center.[/SIZE][/FONT]

[FONT=verdana,arial,helvetica,geneva][SIZE=-1]d) Draw the box in lightly then firm it in.[/SIZE][/FONT]

[FONT=verdana,arial,helvetica,geneva][SIZE=-1]e) Draw the line approximately as shown. 'O' stands for the light source and 'a' is the spot on the ground directly beneath the light. You can place the point anywhere you like but I suggest you place it near where I placed mine if you want a similar shadow.[/SIZE][/FONT]

[FONT=verdana,arial,helvetica,geneva][SIZE=-1]f) Draw light lines from 'O' and 'a' so they cross.[/SIZE][/FONT]

[FONT=verdana,arial,helvetica,geneva][SIZE=-1]g) That gives us our shadow outline. Shade in as shown.[/SIZE][/FONT]

[FONT=verdana,arial,helvetica,geneva][SIZE=-1]h) Using (4x4)16 squares draw in the pyramid. The 'apex' is a point directly above the center of the base. Firm in the pyramid. [/SIZE][/FONT]

[FONT=verdana,arial,helvetica,geneva][SIZE=-1]i) Construct and complete the shadow as shown and shade it in. The student should note that if point 'a' is brought forward the shadow will point backward. [/SIZE][/FONT]
[FONT=verdana,arial,helvetica,geneva]Home study :
[SIZE=-1]Experiment, try adding some other objects such as vertical poles and draw their shadows.[/SIZE][/FONT]
[FONT=verdana,arial,helvetica,geneva][SIZE=+1]GO TO ... LESSON NINE[/SIZE][/FONT]
[FONT=verdana,arial,helvetica,geneva][SIZE=-1]lesson menu [/SIZE][/FONT]
</SPAN>


[/SIZE]
آموزش پرسپکتيو در 12 درس ( درس هشتم )
(سا يه 1)
Allow 40 min[/SIZE][/FONT]
[FONT=verdana,arial,helvetica,geneva]Aim:
[SIZE=-1]To learn how to plot shadows[/SIZE][/FONT]
[FONT=verdana,arial,helvetica,geneva]Materials:[SIZE=-1]
The sketch pad,
HB pencil, ruler.[/SIZE][/FONT]
[FONT=verdana,arial,helvetica,geneva]To To begin revise: [SIZE=-1]We must learn to use our eyes and judge distances and proportions and keep drawing them until they look right. It is the same if we are drawing a face or a box, we must judge one thing in relation to all the others in the same space. [/SIZE][/FONT]
[FONT=verdana,arial,helvetica,geneva]Construct margin and title box on a new page then:[/FONT]
[FONT=verdana,arial,helvetica,geneva][SIZE=-1]b) As in lesson six construct the grid as shown but start from slightly above the title box.[/SIZE][/FONT]
[FONT=verdana,arial,helvetica,geneva][SIZE=-1]c) Note the RVP is moved slightly toward the center.[/SIZE][/FONT]
[FONT=verdana,arial,helvetica,geneva][SIZE=-1]d) Draw the box in lightly then firm it in.[/SIZE][/FONT]
[FONT=verdana,arial,helvetica,geneva][SIZE=-1]e) Draw the line approximately as shown. 'O' stands for the light source and 'a' is the spot on the ground directly beneath the light. You can place the point anywhere you like but I suggest you place it near where I placed mine if you want a similar shadow.[/SIZE][/FONT]
[FONT=verdana,arial,helvetica,geneva][SIZE=-1]f) Draw light lines from 'O' and 'a' so they cross.[/SIZE][/FONT]
[FONT=verdana,arial,helvetica,geneva][SIZE=-1]g) That gives us our shadow outline. Shade in as shown.[/SIZE][/FONT]
[FONT=verdana,arial,helvetica,geneva][SIZE=-1]h) Using (4x4)16 squares draw in the pyramid. The 'apex' is a point directly above the center of the base. Firm in the pyramid. [/SIZE][/FONT]
[FONT=verdana,arial,helvetica,geneva][SIZE=-1]i) Construct and complete the shadow as shown and shade it in. The student should note that if point 'a' is brought forward the shadow will point backward. [/SIZE][/FONT]
[FONT=verdana,arial,helvetica,geneva]Home study :
[SIZE=-1]Experiment, try adding some other objects such as vertical poles and draw their shadows.[/SIZE][/FONT]
[FONT=verdana,arial,helvetica,geneva][SIZE=-1]lesson menu [/SIZE][/FONT]
</SPAN>
[/SIZE]
خانومی
عضو جدید
آموزش پرسپکتيو در 12 درس ( درس نه )
آموزش پرسپکتيو در 12 درس ( درس نه )
(سا يه 2)
[FONT=verdana,arial,helvetica,geneva][SIZE=+3] [/FONT][FONT=verdana,arial,helvetica,geneva]LESSON - PERSPECTIVE NINE - SHADOWS 2[/FONT] [FONT=verdana,arial,helvetica,geneva][SIZE=-1]TIME:
Allow 40 min[/SIZE][/FONT]
[FONT=verdana,arial,helvetica,geneva]Aim:
[SIZE=-1]To learn how to plot shadows on differing surfaces. Here we shall plot and draw the shadow of a ladder leaning against a wall.[/SIZE][/FONT]
[FONT=verdana,arial,helvetica,geneva]Materials:[SIZE=-1]
The sketch pad,
HB pencil, ruler.[/SIZE][/FONT]
[FONT=verdana,arial,helvetica,geneva]To Begin revise: [SIZE=-1]Method of introducing light source and estimating its ground position. Ask which way the shadow should be directed, forward or back.[/SIZE][/FONT]
[FONT=verdana,arial,helvetica,geneva]Construct margin and title box on a new page then:[/FONT]

[FONT=verdana,arial,helvetica,geneva][SIZE=-1]b) Construct the simple corner of a room using a CVP.[/SIZE][/FONT]

[FONT=verdana,arial,helvetica,geneva][SIZE=-1]c) This 'oblique' line will represent one runner of the ladder. Call it 'ab'[/SIZE][/FONT]

[FONT=verdana,arial,helvetica,geneva][SIZE=-1]d) 'cd' is parallel to 'ab'. Construct as shown with lines to VP.[/SIZE][/FONT]

[FONT=verdana,arial,helvetica,geneva][SIZE=-1]e) Add the ladder 'rungs' and firm them in. [/SIZE][/FONT]

[FONT=verdana,arial,helvetica,geneva][SIZE=-1]f) Establish the light source - drop to floor and construct shadow lines as demonstrated above.[/SIZE][/FONT]

[FONT=verdana,arial,helvetica,geneva][SIZE=-1]g) This diagram shows the method of constructing a shadow cast by one of the 'rungs.'[/SIZE][/FONT]

[FONT=verdana,arial,helvetica,geneva][SIZE=-1]h) Shade in the shadow 'freehand' as shown.[/SIZE][/FONT]

[FONT=verdana,arial,helvetica,geneva][SIZE=-1]i) Complete the shadow and add other appropiate details[/SIZE][/FONT]
[FONT=verdana,arial,helvetica,geneva]Home study :
[SIZE=-1]Experiment, add other objects ... a bucket on the floor and its shadow.[/SIZE][/FONT]
[FONT=verdana,arial,helvetica,geneva][SIZE=+1]GO TO ... LESSON TEN[/SIZE][/FONT]
[FONT=verdana,arial,helvetica,geneva][SIZE=-1]lesson menu [/SIZE][/FONT]
</SPAN>


[/SIZE]
آموزش پرسپکتيو در 12 درس ( درس نه )
(سا يه 2)
Allow 40 min[/SIZE][/FONT]
[FONT=verdana,arial,helvetica,geneva]Aim:
[SIZE=-1]To learn how to plot shadows on differing surfaces. Here we shall plot and draw the shadow of a ladder leaning against a wall.[/SIZE][/FONT]
[FONT=verdana,arial,helvetica,geneva]Materials:[SIZE=-1]
The sketch pad,
HB pencil, ruler.[/SIZE][/FONT]
[FONT=verdana,arial,helvetica,geneva]To Begin revise: [SIZE=-1]Method of introducing light source and estimating its ground position. Ask which way the shadow should be directed, forward or back.[/SIZE][/FONT]
[FONT=verdana,arial,helvetica,geneva]Construct margin and title box on a new page then:[/FONT]
[FONT=verdana,arial,helvetica,geneva][SIZE=-1]b) Construct the simple corner of a room using a CVP.[/SIZE][/FONT]
[FONT=verdana,arial,helvetica,geneva][SIZE=-1]c) This 'oblique' line will represent one runner of the ladder. Call it 'ab'[/SIZE][/FONT]
[FONT=verdana,arial,helvetica,geneva][SIZE=-1]d) 'cd' is parallel to 'ab'. Construct as shown with lines to VP.[/SIZE][/FONT]
[FONT=verdana,arial,helvetica,geneva][SIZE=-1]e) Add the ladder 'rungs' and firm them in. [/SIZE][/FONT]
[FONT=verdana,arial,helvetica,geneva][SIZE=-1]f) Establish the light source - drop to floor and construct shadow lines as demonstrated above.[/SIZE][/FONT]
[FONT=verdana,arial,helvetica,geneva][SIZE=-1]g) This diagram shows the method of constructing a shadow cast by one of the 'rungs.'[/SIZE][/FONT]
[FONT=verdana,arial,helvetica,geneva][SIZE=-1]h) Shade in the shadow 'freehand' as shown.[/SIZE][/FONT]
[FONT=verdana,arial,helvetica,geneva][SIZE=-1]i) Complete the shadow and add other appropiate details[/SIZE][/FONT]
[FONT=verdana,arial,helvetica,geneva]Home study :
[SIZE=-1]Experiment, add other objects ... a bucket on the floor and its shadow.[/SIZE][/FONT]
[FONT=verdana,arial,helvetica,geneva][SIZE=-1]lesson menu [/SIZE][/FONT]
</SPAN>
[/SIZE]
خانومی
عضو جدید
آموزش پرسپکتيو در 12 درس (درس ده 1)
آموزش پرسپکتيو در 12 درس (درس ده 1)
(دروا زه)
[FONT=verdana,arial,helvetica,geneva][SIZE=+3] [/FONT][FONT=verdana,arial,helvetica,geneva]LESSON - PERSPECTIVE TEN - ARCHWAY[/FONT] [FONT=verdana,arial,helvetica,geneva][SIZE=-1]TIME:
Allow 80 min - best broken into two sessions with set homework in between.[/SIZE][/FONT]
[FONT=verdana,arial,helvetica,geneva]Aim:
[SIZE=-1]To draw a Roman style triumphal arch utilising a freehand approach to drawing lines. This lessons eventual success will depend on the student eventually NOT drawing a straight line ... and thereby mot being terrified of making a mistake.[/SIZE][/FONT]
[FONT=verdana,arial,helvetica,geneva]Materials:[SIZE=-1]
The sketch pad,
HB pencil, ruler.[/SIZE][/FONT]
[FONT=verdana,arial,helvetica,geneva]Construct margin and title box on a new page then:[/FONT]

[FONT=verdana,arial,helvetica,geneva][SIZE=-1]b) Construct the rectangle and place a CVP in the approximate positions shown above.[/SIZE][/FONT]

[FONT=verdana,arial,helvetica,geneva][SIZE=-1]c) Lightly draw the arch with the proportions to approximate those above.[/SIZE][/FONT]

[FONT=verdana,arial,helvetica,geneva][SIZE=-1]d) Note the method used to position the back (inside curve) of the arch. The intersection point with the fornt curve is critical.[/SIZE][/FONT]

[FONT=verdana,arial,helvetica,geneva][SIZE=-1]e) Add the 'minor' rectangles as shown on the face of the arch.[/SIZE][/FONT]

[FONT=verdana,arial,helvetica,geneva][SIZE=-1]f) There are two walls indicated and lightly sketched in as above. You will see their complete form in the drawing shown next.[/SIZE][/FONT]

[FONT=verdana,arial,helvetica,geneva][SIZE=-1]g) The student must now discard the ruler. All the firm lines must be done 'freehand'. Any ruled lines will look inconsistent and out of place. Use short firm strokes rather than trying to be too ambitious. This arch is supposed to be old and decaying therefore irregular lines are what is required. Now the arch and its surrounds should begin to take form.[/SIZE][/FONT]

[FONT=verdana,arial,helvetica,geneva][SIZE=-1]h) Clean it up and add some shading.[/SIZE][/FONT]

[FONT=verdana,arial,helvetica,geneva][SIZE=-1]i) The light source is to be from 'top right' so shade the raised frontal areas on the arch as shown ... shading to the right and below.[/SIZE][/FONT]

[FONT=verdana,arial,helvetica,geneva][SIZE=-1]j) Add some 'Roman' letters (the detail is where observation and creativity interact) and shade some areas...[/SIZE][/FONT]

[FONT=verdana,arial,helvetica,geneva]Note the shadows. [SIZE=-1]At this juncture the shadows are merely 'parallel'. Since the drawing is not complicated regarding 'shadows' and the sun is very high and distant we can assume an almost parallel set of light 'rays'.[/SIZE][/FONT]
[FONT=verdana,arial,helvetica,geneva]Homework: [SIZE=-1]This particular arch is a minor detail in a painting by a well known artist who was born in Venice on October 18th. 1697. It appears in at least two of his paintings. The student to gain extra marks for naming the artist and even more for naming one of the paintings that contain the arch. Additional marks could be awarded if the student were to name the origin of the arch.[/SIZE][/FONT]
[FONT=verdana,arial,helvetica,geneva]CONTINUED....[/FONT]
[FONT=verdana,arial,helvetica,geneva][SIZE=+1]GO TO ... LESSON TEN (CONT.)[/SIZE][/FONT]
[FONT=verdana,arial,helvetica,geneva][SIZE=-1]lesson menu [/SIZE][/FONT]
</SPAN>


[/SIZE]
آموزش پرسپکتيو در 12 درس (درس ده 1)
(دروا زه)
Allow 80 min - best broken into two sessions with set homework in between.[/SIZE][/FONT]
[FONT=verdana,arial,helvetica,geneva]Aim:
[SIZE=-1]To draw a Roman style triumphal arch utilising a freehand approach to drawing lines. This lessons eventual success will depend on the student eventually NOT drawing a straight line ... and thereby mot being terrified of making a mistake.[/SIZE][/FONT]
[FONT=verdana,arial,helvetica,geneva]Materials:[SIZE=-1]
The sketch pad,
HB pencil, ruler.[/SIZE][/FONT]
[FONT=verdana,arial,helvetica,geneva]Construct margin and title box on a new page then:[/FONT]
[FONT=verdana,arial,helvetica,geneva][SIZE=-1]b) Construct the rectangle and place a CVP in the approximate positions shown above.[/SIZE][/FONT]
[FONT=verdana,arial,helvetica,geneva][SIZE=-1]c) Lightly draw the arch with the proportions to approximate those above.[/SIZE][/FONT]
[FONT=verdana,arial,helvetica,geneva][SIZE=-1]d) Note the method used to position the back (inside curve) of the arch. The intersection point with the fornt curve is critical.[/SIZE][/FONT]
[FONT=verdana,arial,helvetica,geneva][SIZE=-1]e) Add the 'minor' rectangles as shown on the face of the arch.[/SIZE][/FONT]
[FONT=verdana,arial,helvetica,geneva][SIZE=-1]f) There are two walls indicated and lightly sketched in as above. You will see their complete form in the drawing shown next.[/SIZE][/FONT]
[FONT=verdana,arial,helvetica,geneva][SIZE=-1]g) The student must now discard the ruler. All the firm lines must be done 'freehand'. Any ruled lines will look inconsistent and out of place. Use short firm strokes rather than trying to be too ambitious. This arch is supposed to be old and decaying therefore irregular lines are what is required. Now the arch and its surrounds should begin to take form.[/SIZE][/FONT]
[FONT=verdana,arial,helvetica,geneva][SIZE=-1]h) Clean it up and add some shading.[/SIZE][/FONT]
[FONT=verdana,arial,helvetica,geneva][SIZE=-1]i) The light source is to be from 'top right' so shade the raised frontal areas on the arch as shown ... shading to the right and below.[/SIZE][/FONT]
[FONT=verdana,arial,helvetica,geneva][SIZE=-1]j) Add some 'Roman' letters (the detail is where observation and creativity interact) and shade some areas...[/SIZE][/FONT]
[FONT=verdana,arial,helvetica,geneva]Note the shadows. [SIZE=-1]At this juncture the shadows are merely 'parallel'. Since the drawing is not complicated regarding 'shadows' and the sun is very high and distant we can assume an almost parallel set of light 'rays'.[/SIZE][/FONT]
[FONT=verdana,arial,helvetica,geneva]Homework: [SIZE=-1]This particular arch is a minor detail in a painting by a well known artist who was born in Venice on October 18th. 1697. It appears in at least two of his paintings. The student to gain extra marks for naming the artist and even more for naming one of the paintings that contain the arch. Additional marks could be awarded if the student were to name the origin of the arch.[/SIZE][/FONT]
[FONT=verdana,arial,helvetica,geneva]CONTINUED....[/FONT]
[FONT=verdana,arial,helvetica,geneva][SIZE=-1]lesson menu [/SIZE][/FONT]
</SPAN>
[/SIZE]
خانومی
عضو جدید
آموزش پرسپکتيو در 12 درس (دروا زه2
آموزش پرسپکتيو در 12 درس (دروا زه2
دروا زه
[FONT=verdana,arial,helvetica,geneva][SIZE=+3] [/FONT][FONT=verdana,arial,helvetica,geneva]LESSON - TEN ... CONTINUED[/FONT] [FONT=verdana,arial,helvetica,geneva]Aim: [SIZE=-1]To reinforce the notion of 'logical size'. The size of objects being determined by introducing a familiar object at the same 'level' (a similar distance from the viewer). Then to complete the drawing started in the previous lesson.[/SIZE][/FONT]
[FONT=verdana,arial,helvetica,geneva][SIZE=-1]The teacher should print off the following three drawings and hand them out as reference drawings. [/SIZE][/FONT]

[FONT=verdana,arial,helvetica,geneva][SIZE=-1]a) Here I have introduced 'the admiral' and put him in the arch. Suddenly the arch has a particular and definite size. Ask the students, why is that? [/SIZE][/FONT]
[FONT=verdana,arial,helvetica,geneva][SIZE=-1]From the moment a baby opens its eyes it begins keying-in shapes, with one of the first being the human face and body. Then it learns to recognise various other shapes in order of their importance. The child also learns to judge how far or how close is a particular object. Ask the class how this is done? [/SIZE][/FONT]
[FONT=verdana,arial,helvetica,geneva][SIZE=-1]You could mention that these common perceptions are what bind people together. There are, of course philosophical implications here concernig the commonality of experience ... but that is what drawing is all about![/SIZE][/FONT]
[FONT=verdana,arial,helvetica,geneva][SIZE=-1]Anyway, in the order of things human the body is a far more dominant form than any old archway.[/SIZE][/FONT]
[FONT=verdana,arial,helvetica,geneva][SIZE=-1]This body of our 'Admiral Cowdisley Shovel' determines the size of the arch (how high is it here?) as we all know the avereage height of the human body, but, what if we shrink the poor old sailor?[/SIZE][/FONT]

[FONT=verdana,arial,helvetica,geneva][SIZE=-1]b) Suddenly the arch has grown. How tall is it now?[/SIZE][/FONT]

[FONT=verdana,arial,helvetica,geneva][SIZE=-1]c) OK so now I have multiplied the figures and drawn them forward. If we roughly draw lines through the Admiral's head and feet where would they meet?
It the person viewing this scene shorter ot taller than the 'Admiral'?[/SIZE][/FONT]
[FONT=verdana,arial,helvetica,geneva][SIZE=-1]Let's go back to our unfinished drawing.[/SIZE][/FONT]
[FONT=verdana,arial,helvetica,geneva][SIZE=-1]d) Note the detail lines suggesting the blockwork on the arch radiate out from the curve of the arc and then square. This is a tiny detail but one born of awareness. Ask the pupil about laying bricks that will form an arch, or the color of their front gate, or the size of a normal teacup. Test their awareness to common things and ask them to test you.[/SIZE][/FONT]

[FONT=verdana,arial,helvetica,geneva][SIZE=-1]e) Using method in previous construct perspective 'grid' on the ground. Remember the firm lines are to be done freehand.[/SIZE][/FONT]

[FONT=verdana,arial,helvetica,geneva][SIZE=-1]f) The pupil should be encouraged to decide on the design of the forecourt and individualise it as much as possible. Add some trees behind the wall to soften the starkness.[/SIZE][/FONT]
[FONT=verdana,arial,helvetica,geneva]HOMEWORK: [SIZE=-1]Complete the drawing by adding a small figure in the arch.[/SIZE][/FONT]
[FONT=verdana,arial,helvetica,geneva][SIZE=+1]GO TO ... THE ROAD - ELEVEN[/SIZE][/FONT]
[FONT=verdana,arial,helvetica,geneva][SIZE=-1]lesson menu [/SIZE][/FONT]
</SPAN>


[/SIZE]
آموزش پرسپکتيو در 12 درس (دروا زه2
دروا زه
[FONT=verdana,arial,helvetica,geneva][SIZE=-1]The teacher should print off the following three drawings and hand them out as reference drawings. [/SIZE][/FONT]
[FONT=verdana,arial,helvetica,geneva][SIZE=-1]a) Here I have introduced 'the admiral' and put him in the arch. Suddenly the arch has a particular and definite size. Ask the students, why is that? [/SIZE][/FONT]
[FONT=verdana,arial,helvetica,geneva][SIZE=-1]From the moment a baby opens its eyes it begins keying-in shapes, with one of the first being the human face and body. Then it learns to recognise various other shapes in order of their importance. The child also learns to judge how far or how close is a particular object. Ask the class how this is done? [/SIZE][/FONT]
[FONT=verdana,arial,helvetica,geneva][SIZE=-1]You could mention that these common perceptions are what bind people together. There are, of course philosophical implications here concernig the commonality of experience ... but that is what drawing is all about![/SIZE][/FONT]
[FONT=verdana,arial,helvetica,geneva][SIZE=-1]Anyway, in the order of things human the body is a far more dominant form than any old archway.[/SIZE][/FONT]
[FONT=verdana,arial,helvetica,geneva][SIZE=-1]This body of our 'Admiral Cowdisley Shovel' determines the size of the arch (how high is it here?) as we all know the avereage height of the human body, but, what if we shrink the poor old sailor?[/SIZE][/FONT]
[FONT=verdana,arial,helvetica,geneva][SIZE=-1]b) Suddenly the arch has grown. How tall is it now?[/SIZE][/FONT]
[FONT=verdana,arial,helvetica,geneva][SIZE=-1]c) OK so now I have multiplied the figures and drawn them forward. If we roughly draw lines through the Admiral's head and feet where would they meet?
It the person viewing this scene shorter ot taller than the 'Admiral'?[/SIZE][/FONT]
[FONT=verdana,arial,helvetica,geneva][SIZE=-1]Let's go back to our unfinished drawing.[/SIZE][/FONT]
[FONT=verdana,arial,helvetica,geneva][SIZE=-1]d) Note the detail lines suggesting the blockwork on the arch radiate out from the curve of the arc and then square. This is a tiny detail but one born of awareness. Ask the pupil about laying bricks that will form an arch, or the color of their front gate, or the size of a normal teacup. Test their awareness to common things and ask them to test you.[/SIZE][/FONT]
[FONT=verdana,arial,helvetica,geneva][SIZE=-1]e) Using method in previous construct perspective 'grid' on the ground. Remember the firm lines are to be done freehand.[/SIZE][/FONT]
[FONT=verdana,arial,helvetica,geneva][SIZE=-1]f) The pupil should be encouraged to decide on the design of the forecourt and individualise it as much as possible. Add some trees behind the wall to soften the starkness.[/SIZE][/FONT]
[FONT=verdana,arial,helvetica,geneva]HOMEWORK: [SIZE=-1]Complete the drawing by adding a small figure in the arch.[/SIZE][/FONT]
[FONT=verdana,arial,helvetica,geneva][SIZE=-1]lesson menu [/SIZE][/FONT]
</SPAN>
[/SIZE]
خانومی
عضو جدید
آموزش پرسپکتيو در 12 درس (درس 11¡ را ه)
آموزش پرسپکتيو در 12 درس (درس 11¡ را ه)
را ه
[FONT=verdana,arial,helvetica,geneva][SIZE=+3] [/SIZE][/FONT][FONT=verdana,arial,helvetica,geneva]LESSON - PERSPECTIVE ELEVEN - ROAD[/FONT] [FONT=verdana,arial,helvetica,geneva][SIZE=-1]TIME:
Allow 40 min (TEN MIN INTRODUCTION)[/SIZE][/FONT]
[FONT=verdana,arial,helvetica,geneva]Aim:
[SIZE=-1]To understand the principle of multiple vanishing points and how they work in nature.[/SIZE][/FONT]
[FONT=verdana,arial,helvetica,geneva]Materials:[SIZE=-1] The sketch pad, HB pencil, ruler.[/SIZE][/FONT]
[FONT=verdana,arial,helvetica,geneva]In this, the first part of this lesson the teacher will need to demonstrate the following on the chalkboard or pad ...[/FONT]
[FONT=verdana,arial,helvetica,geneva][SIZE=-1]Alternatively, if the teacher deems necessary, these first six explanatory diagrams can be printed and handed out. However a quick demonstration on a chalkboard will give everyone confidence. The teacher could do this with just ten minutes of preparation ... OK, I know your time is valuable, and I must admit, I never prepared a lesson in my life. I just did it by sensing the needs of the student and seeing where that might lead ...[/SIZE][/FONT]

[FONT=verdana,arial,helvetica,geneva][SIZE=-1]... in a classroom of thirty odd students that is called living on the edge. But then again I am easily bored; anyway, remember our railway line in a previous lesson?[/SIZE][/FONT]

[FONT=verdana,arial,helvetica,geneva][SIZE=-1]Move the vanishing point along the horizon line to the right as above. Just use common judgement to place the sleepers ... as you might do in any grammar class.[/SIZE][/FONT]

[FONT=verdana,arial,helvetica,geneva][SIZE=-1]Of course, as the line bends, it does with a 'curve'. Draw in the freehand curve as shown.[/SIZE][/FONT]

[FONT=verdana,arial,helvetica,geneva][SIZE=-1]Next, we find a vanishing point 'above' the horizon! This will have the effect of making the line appear to rise up. See above.[/SIZE][/FONT]

[FONT=verdana,arial,helvetica,geneva][SIZE=-1]Then go down again ... with a vanishing point now below the line.[/SIZE][/FONT]

[FONT=verdana,arial,helvetica,geneva][SIZE=-1]Firm in the lines and explain that every 'regular' object can be placed in space to have its own vanishing point. Here we have merely joined a few together.[/SIZE][/FONT]
[FONT=verdana,arial,helvetica,geneva]Students construct margin and title box on a new page then:[/FONT]

[FONT=verdana,arial,helvetica,geneva][SIZE=-1]a) In approximate positions, as above, lightly construct a road bending to the right and descending. ...[/SIZE][/FONT]

[FONT=verdana,arial,helvetica,geneva][SIZE=-1]b) Firm in until the curves transcend the horizontal ...[/SIZE][/FONT]

[FONT=verdana,arial,helvetica,geneva][SIZE=-1]c) and add a nice curving hill.[/SIZE][/FONT]

[FONT=verdana,arial,helvetica,geneva][SIZE=-1]d) Change direction and do the same thing again. Your own 'judgement' should be used to determine the 'new' width of the road. Logically it must be smaller than its width as it disappears over the first hill. Point out that this width will determine just how far the first hill is from the second.[/SIZE][/FONT]
[FONT=verdana,arial,helvetica,geneva]CONTINUED....[/FONT]
[FONT=verdana,arial,helvetica,geneva][SIZE=+1]GO TO ... LESSON ELEVEN (CONT.)[/SIZE][/FONT]
[FONT=verdana,arial,helvetica,geneva][SIZE=-1]lesson menu [/SIZE][/FONT]
</SPAN>


آموزش پرسپکتيو در 12 درس (درس 11¡ را ه)
را ه
Allow 40 min (TEN MIN INTRODUCTION)[/SIZE][/FONT]
[FONT=verdana,arial,helvetica,geneva]Aim:
[SIZE=-1]To understand the principle of multiple vanishing points and how they work in nature.[/SIZE][/FONT]
[FONT=verdana,arial,helvetica,geneva]Materials:[SIZE=-1] The sketch pad, HB pencil, ruler.[/SIZE][/FONT]
[FONT=verdana,arial,helvetica,geneva]In this, the first part of this lesson the teacher will need to demonstrate the following on the chalkboard or pad ...[/FONT]
[FONT=verdana,arial,helvetica,geneva][SIZE=-1]Alternatively, if the teacher deems necessary, these first six explanatory diagrams can be printed and handed out. However a quick demonstration on a chalkboard will give everyone confidence. The teacher could do this with just ten minutes of preparation ... OK, I know your time is valuable, and I must admit, I never prepared a lesson in my life. I just did it by sensing the needs of the student and seeing where that might lead ...[/SIZE][/FONT]
[FONT=verdana,arial,helvetica,geneva][SIZE=-1]... in a classroom of thirty odd students that is called living on the edge. But then again I am easily bored; anyway, remember our railway line in a previous lesson?[/SIZE][/FONT]
[FONT=verdana,arial,helvetica,geneva][SIZE=-1]Move the vanishing point along the horizon line to the right as above. Just use common judgement to place the sleepers ... as you might do in any grammar class.[/SIZE][/FONT]
[FONT=verdana,arial,helvetica,geneva][SIZE=-1]Of course, as the line bends, it does with a 'curve'. Draw in the freehand curve as shown.[/SIZE][/FONT]
[FONT=verdana,arial,helvetica,geneva][SIZE=-1]Next, we find a vanishing point 'above' the horizon! This will have the effect of making the line appear to rise up. See above.[/SIZE][/FONT]
[FONT=verdana,arial,helvetica,geneva][SIZE=-1]Then go down again ... with a vanishing point now below the line.[/SIZE][/FONT]
[FONT=verdana,arial,helvetica,geneva][SIZE=-1]Firm in the lines and explain that every 'regular' object can be placed in space to have its own vanishing point. Here we have merely joined a few together.[/SIZE][/FONT]
[FONT=verdana,arial,helvetica,geneva]Students construct margin and title box on a new page then:[/FONT]
[FONT=verdana,arial,helvetica,geneva][SIZE=-1]a) In approximate positions, as above, lightly construct a road bending to the right and descending. ...[/SIZE][/FONT]
[FONT=verdana,arial,helvetica,geneva][SIZE=-1]b) Firm in until the curves transcend the horizontal ...[/SIZE][/FONT]
[FONT=verdana,arial,helvetica,geneva][SIZE=-1]c) and add a nice curving hill.[/SIZE][/FONT]
[FONT=verdana,arial,helvetica,geneva][SIZE=-1]d) Change direction and do the same thing again. Your own 'judgement' should be used to determine the 'new' width of the road. Logically it must be smaller than its width as it disappears over the first hill. Point out that this width will determine just how far the first hill is from the second.[/SIZE][/FONT]
[FONT=verdana,arial,helvetica,geneva]CONTINUED....[/FONT]
[FONT=verdana,arial,helvetica,geneva][SIZE=-1]lesson menu [/SIZE][/FONT]
</SPAN>
خانومی
عضو جدید
آموزش پرسپکتيو در 12 درس (درس 11¡ را ه ادامه )
آموزش پرسپکتيو در 12 درس (درس 11¡ را ه ادامه )
11 را ه
[FONT=verdana,arial,helvetica,geneva][SIZE=+3] [/SIZE][/FONT][FONT=verdana,arial,helvetica,geneva]LESSON - PERSPECTIVE ELEVEN - ROAD (CONTINUED)[/FONT]

[FONT=verdana,arial,helvetica,geneva][SIZE=-1]f) Define the second hill as I have, with a nice flowing curve.[/SIZE][/FONT]

[FONT=verdana,arial,helvetica,geneva][SIZE=-1]g) Using three more 'vanishing points' (VP's) repeat the exercise; only don't change direction.[/SIZE][/FONT]

[FONT=verdana,arial,helvetica,geneva][SIZE=-1]e) Title the drawing and if time permits begin some general shading.[/SIZE][/FONT]
[FONT=verdana,arial,helvetica,geneva]Homework: [SIZE=-1]Add a plouged field, fences, trees, carts, cars, buildings, etc.[/SIZE][/FONT]
[FONT=verdana,arial,helvetica,geneva][SIZE=+1]GO TO ... LESSON TWELVE[/SIZE][/FONT]
[FONT=verdana,arial,helvetica,geneva][SIZE=-1]lesson menu [/SIZE][/FONT]
</SPAN>


آموزش پرسپکتيو در 12 درس (درس 11¡ را ه ادامه )
11 را ه
[FONT=verdana,arial,helvetica,geneva][SIZE=-1]f) Define the second hill as I have, with a nice flowing curve.[/SIZE][/FONT]
[FONT=verdana,arial,helvetica,geneva][SIZE=-1]g) Using three more 'vanishing points' (VP's) repeat the exercise; only don't change direction.[/SIZE][/FONT]
[FONT=verdana,arial,helvetica,geneva][SIZE=-1]e) Title the drawing and if time permits begin some general shading.[/SIZE][/FONT]
[FONT=verdana,arial,helvetica,geneva]Homework: [SIZE=-1]Add a plouged field, fences, trees, carts, cars, buildings, etc.[/SIZE][/FONT]
[FONT=verdana,arial,helvetica,geneva][SIZE=-1]lesson menu [/SIZE][/FONT]
</SPAN>
خانومی
عضو جدید
آموزش پرسپکتيو در دوا زده درس درس دوا زده
آموزش پرسپکتيو در دوا زده درس درس دوا زده
درس دوا زده
[FONT=verdana,arial,helvetica,geneva][SIZE=+3] [/SIZE][/FONT][FONT=verdana,arial,helvetica,geneva]LESSON - TWELVE[/FONT] [FONT=verdana,arial,helvetica,geneva]Aim: [SIZE=-1]To introduce, explain and use extended vanishing points off the page.[/SIZE][/FONT]
[FONT=verdana,arial,helvetica,geneva][SIZE=-1]The teacher should print off the following four drawings and hand them out as reference sheets. [/SIZE][/FONT]

[FONT=verdana,arial,helvetica,geneva][SIZE=-1]a) This drawing of a book is done as a simple two point perspective using the same method we used on the city buildings in lesson number one.[/SIZE][/FONT]

[FONT=verdana,arial,helvetica,geneva][SIZE=-1]b) What would happen if we zoomed in and cut out a part of our drawing? ...?[/SIZE][/FONT]

[FONT=verdana,arial,helvetica,geneva][SIZE=-1]c) Then we made that drawing our full size drawing? Above is the result. The only problem is that our vanishing points have disappeared completely off our page. What then are we to do for this type of drawing?[/SIZE][/FONT]

[FONT=verdana,arial,helvetica,geneva][SIZE=-1]d) We could try and place a much larger piece of paper under our pad and extend our lines as shown above, but more simple is to 'imagine' their position and just draw part of our light lines outwards as if the 'vanishing points' points were actually there.[/SIZE][/FONT]
[FONT=verdana,arial,helvetica,geneva][SIZE=+1]GO TO ... TWELVE CONTINUED[/SIZE][/FONT]
[FONT=verdana,arial,helvetica,geneva][SIZE=-1]lesson menu [/SIZE][/FONT]
</SPAN>


آموزش پرسپکتيو در دوا زده درس درس دوا زده
درس دوا زده
[FONT=verdana,arial,helvetica,geneva][SIZE=-1]The teacher should print off the following four drawings and hand them out as reference sheets. [/SIZE][/FONT]
[FONT=verdana,arial,helvetica,geneva][SIZE=-1]a) This drawing of a book is done as a simple two point perspective using the same method we used on the city buildings in lesson number one.[/SIZE][/FONT]
[FONT=verdana,arial,helvetica,geneva][SIZE=-1]b) What would happen if we zoomed in and cut out a part of our drawing? ...?[/SIZE][/FONT]
[FONT=verdana,arial,helvetica,geneva][SIZE=-1]c) Then we made that drawing our full size drawing? Above is the result. The only problem is that our vanishing points have disappeared completely off our page. What then are we to do for this type of drawing?[/SIZE][/FONT]
[FONT=verdana,arial,helvetica,geneva][SIZE=-1]d) We could try and place a much larger piece of paper under our pad and extend our lines as shown above, but more simple is to 'imagine' their position and just draw part of our light lines outwards as if the 'vanishing points' points were actually there.[/SIZE][/FONT]
[FONT=verdana,arial,helvetica,geneva][SIZE=-1]lesson menu [/SIZE][/FONT]
</SPAN>
خانومی
عضو جدید
آموزش پرسپکتيو در دوا زده درس درس دوا زده دو
آموزش پرسپکتيو در دوا زده درس درس دوا زده دو
کتاب
[FONT=verdana,arial,helvetica,geneva][SIZE=+3] [/FONT][FONT=verdana,arial,helvetica,geneva]LESSON - TWELVE cont. [/FONT][FONT=verdana,arial,helvetica,geneva]Aim: [SIZE=-1]To draw a book using extended vanishing points.[/SIZE][/FONT]
[FONT=verdana,arial,helvetica,geneva][SIZE=-1]TIME:
Allow 40min[/SIZE][/FONT]
[FONT=verdana,arial,helvetica,geneva]Materials:[SIZE=-1]
The sketch pad,
HB pencil, ruler.[/SIZE][/FONT]
[FONT=verdana,arial,helvetica,geneva]Construct margin and title box then:[/FONT]

[FONT=verdana,arial,helvetica,geneva][SIZE=-1]a) As with the example in the previous lesson construct the lines as shown as if there were vanishing points off the page.[/SIZE][/FONT]

[FONT=verdana,arial,helvetica,geneva][SIZE=-1]b) Complete the block lightly as it will form the basis of our book. Note CA is larger than DB, AB is larger than CD, AE is larger than BF and GC.[/SIZE][/FONT]

[FONT=verdana,arial,helvetica,geneva][SIZE=-1]c) Lightly draw in some more main features of the book. It should now look as if it sits on the desk in front of the student.[/SIZE][/FONT]

[FONT=verdana,arial,helvetica,geneva][SIZE=-1]d) Put away the ruler and begin to sketch the book freehand ... using darker lines as shown above.[/SIZE][/FONT]

[FONT=verdana,arial,helvetica,geneva][SIZE=-1]e) Complete the details using shading and your imagination. Add a couple of loose sheets of paper.[/SIZE][/FONT]
[FONT=verdana,arial,helvetica,geneva]HOMEWORK: [SIZE=-1]Complete by adding a pencil.[/SIZE][/FONT]
[FONT=verdana,arial,helvetica,geneva][SIZE=+1]GO TO ... PART TWO INTODUCTION[/SIZE][/FONT]
[FONT=verdana,arial,helvetica,geneva][SIZE=-1]lesson menu [/SIZE][/FONT]
</SPAN>


[/SIZE]
</SPAN>
آموزش پرسپکتيو در دوا زده درس درس دوا زده دو
کتاب
[FONT=verdana,arial,helvetica,geneva][SIZE=-1]TIME:
Allow 40min[/SIZE][/FONT]
[FONT=verdana,arial,helvetica,geneva]Materials:[SIZE=-1]
The sketch pad,
HB pencil, ruler.[/SIZE][/FONT]
[FONT=verdana,arial,helvetica,geneva]Construct margin and title box then:[/FONT]
[FONT=verdana,arial,helvetica,geneva][SIZE=-1]a) As with the example in the previous lesson construct the lines as shown as if there were vanishing points off the page.[/SIZE][/FONT]
[FONT=verdana,arial,helvetica,geneva][SIZE=-1]b) Complete the block lightly as it will form the basis of our book. Note CA is larger than DB, AB is larger than CD, AE is larger than BF and GC.[/SIZE][/FONT]
[FONT=verdana,arial,helvetica,geneva][SIZE=-1]c) Lightly draw in some more main features of the book. It should now look as if it sits on the desk in front of the student.[/SIZE][/FONT]
[FONT=verdana,arial,helvetica,geneva][SIZE=-1]d) Put away the ruler and begin to sketch the book freehand ... using darker lines as shown above.[/SIZE][/FONT]
[FONT=verdana,arial,helvetica,geneva][SIZE=-1]e) Complete the details using shading and your imagination. Add a couple of loose sheets of paper.[/SIZE][/FONT]
[FONT=verdana,arial,helvetica,geneva]HOMEWORK: [SIZE=-1]Complete by adding a pencil.[/SIZE][/FONT]
[FONT=verdana,arial,helvetica,geneva][SIZE=-1]lesson menu [/SIZE][/FONT]
</SPAN>
[/SIZE]
</SPAN>
suro0sh
عضو جدید
4 Point Lineal Perspective
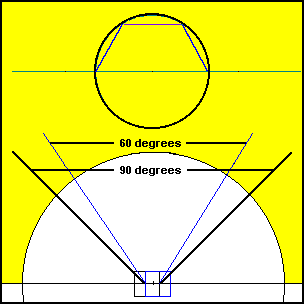
The horizon line is 25 miles out at sea if you are 6-foot tall standing at sea level, it's 200 miles out if you're on a 10,000 foot high mountain.
The pictures blue line is the horizon line around you in three 60 degree chunks.
The center section is the only undistorted section of the three. It can be seen with both eyes at the same time.
This section should be the maximum and normal width of your landscape support. The dimensions of this support would vary depending on how far away the support is away from you.
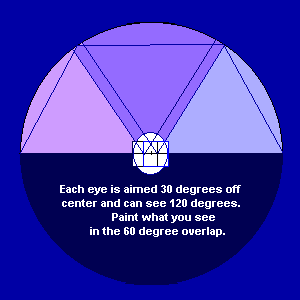
Each eye is aimed 30 degrees off center, each eye sees 120 degrees. The full visible horizon in front of you, including all of your peripheral vision of both eyes is 180 degrees. For top accuracy use only one eye and keep your head in the same place and only use that center 60 degrees of overlapped vision.
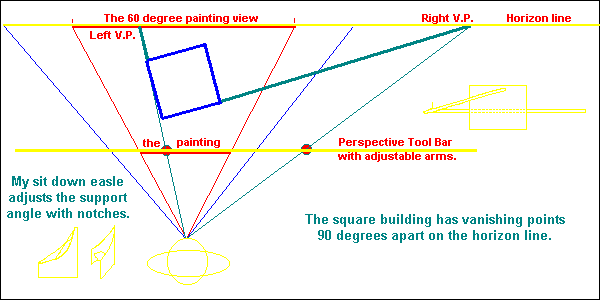
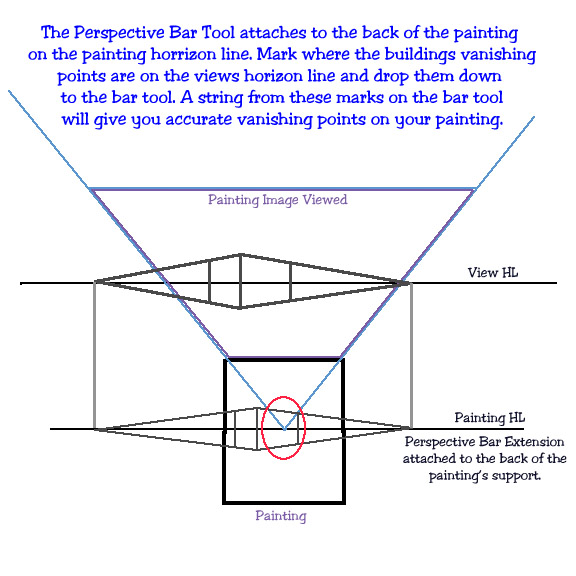
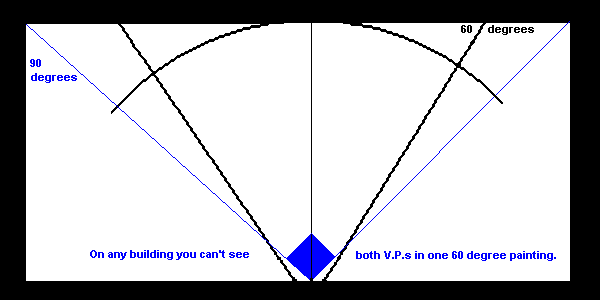
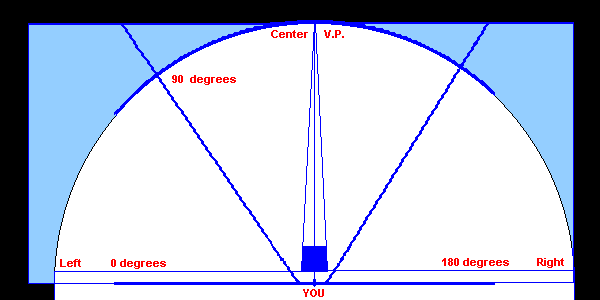
Here is the straight horizon line used in conjunction with the surrounding concentric ring horizon line.
See how hard it is to relate the 90 degree angle of a box turned at this angle on a straight horizon, the straight horizon line would have to be a very long gentle curve. It's simple on a concentric circle horizon line and the Horizon Bar Tool.
Every square object has a right and left vanishing point 90 degrees apart on the horizon line. This puts one of the vanishing points 30° out of any normal 60° painting.

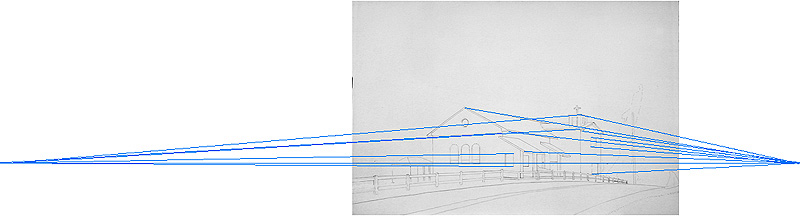

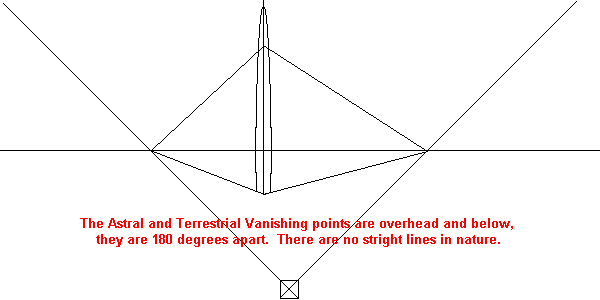
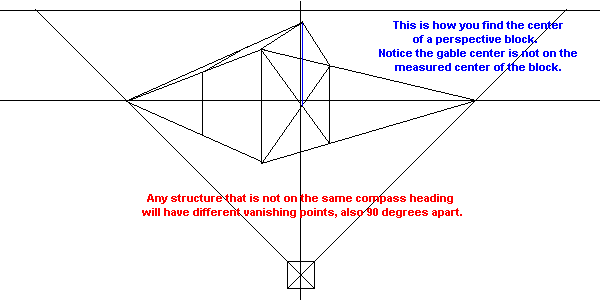
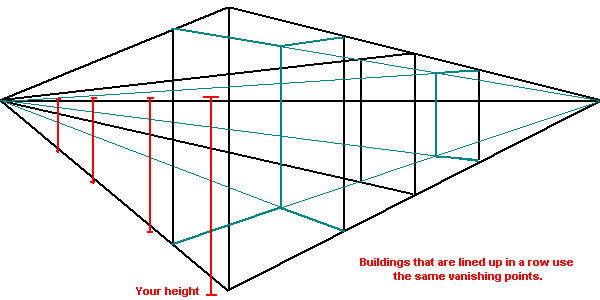
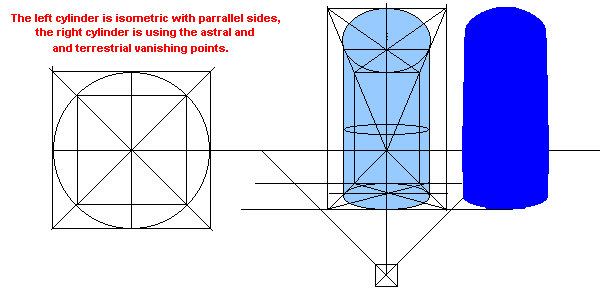
suro0sh
عضو جدید
جزوه اموزشی پرسپکتیو به همراه مبحث سایه
جزوه اموزشی پرسپکتیو به همراه مبحث سایه
جزوه اموزشی پرسپکتیو به همراه مبحث سایه به فارسی و به فرمتpdf
از وبلاگ آقای مهندس سجاد نازی
بقیه اش رو هم به همین زودی تو فروم آپلود میکنم،
ضمنا یک پیشنهاد داشتم این تاپیک تنها تاپیکی که کامل راجع به پرسپکتیو توش بحث شده، پس اگر مدیران عزیز تالار زحمت بکشن و مهمش بکنند دسترسی بهش راحت تر میشه
جزوه اموزشی پرسپکتیو به همراه مبحث سایه
از وبلاگ آقای مهندس سجاد نازی
بقیه اش رو هم به همین زودی تو فروم آپلود میکنم،
ضمنا یک پیشنهاد داشتم این تاپیک تنها تاپیکی که کامل راجع به پرسپکتیو توش بحث شده، پس اگر مدیران عزیز تالار زحمت بکشن و مهمش بکنند دسترسی بهش راحت تر میشه
پیوست ها


5967
عضو جدید
عید مبارکسلام بچه ها
منم کلا در مورد منحنی کشیدن توی پسپکتیومشکل دارم!
خیلی سخته!!!
دوست خوب
کشیدن منحنی تو پرسپکتیو راحته
اگه منظورت کشیدن یه منحنی هندسی مثل نیم دایره یا دایره که قابلیت محاط شدن داخل مربع رو دارن باید اول مربع رو تو پرسپکتیو بکشی واز نقاط راهنما استفاده کنی
مثلا اقطار و خطوط تقارن و محل برخوردشون با منحنی و پیدا کردن اون نقاط تو پرسپکتیو
اما اگه منظورت از منحنی منحنی هایی که از هیچ قانون ساده ی هندسی پیروی نمی کنن باید اون منحنی رو قسمت بندی کنی بعد به روش بالا عمل کنی
5967
عضو جدید
کشیدن دایره تو پرسپکتیو بوسیله مربع محیطش که راخته بالا هم توضیح دادممنم بدجوری مشکل دارم با این موضوع مخصوصا پله گرد کاش یکی کمک کنه
حالا اگه دایره رو ارتفاع بدی میشه استوانه!!!
پلان پله رو رویدایره ای که قاعده استوانه تو پرسپکتیوه میکشی بعد به محل مورد نظر انتقالش میدی به همین راحتی
امیدوارم مفهوم گفته باشم
من باید برم دانشگاه .کلاس دارم. میشه لطفا پلان ابلیک پله رو برام توضیح بدی؟ با تصویر. مرسی مرسی مرسی که به همه کمک میکنی.
تصاوير مجسم موازي مايل يا ابليك
تصاوير ابليك با توجه به تغيير طول يالهاي جانبي آن به سه نوع تقسيم مي شوند كه عبارتند از :
1) تصاوير كاوالير
2) تصاوير جنرال
3) تصاوير كابينت
تصاوير كاوالير:

تصاوير جنرال :

اين تصاوير مانند پرسپكتيو كاوالير رسم مي گردد با اين تفاوت كه طولها بر روي محوري كه با زوايه 45 درجه رسم شده است به نسبت (3 / 2) تا (4 / 3) ترسيم مي شوند. نكته 1:
تصاوير ابليك را مي توان به شكل ديگري نيز تقسيم بندي كرد.
نما ابليك :
در اين نوع تصاوير با استفاده از نماي جسم پرسپكتيو ترميم مي شود.
پلان ابليك :
در اين نوع تصاوير با استفاده از پلان جسم پرسپكتيو ترسيم مي شود.
نكته 2 :
پلان ابليك بيشتر با زواياي 30 و 60 درجه يا با زواياي 45 و 45 درجه ترسيم مي شوند.


...............................
مایل (ابلیک):
که شامل کاوالیر ، جنرال، کابینت، پلان ابلیک، نما ابلیک که هریک از اینها را با رسم شکل نشان میدهیم.
1- کاوالیر: تمام اندازه ها حقیقی .
2- جنرال: هر سه ضلع اندازه 3/2 یا 4/3 کوچکتر میشود.
کابینت: تمام اندازه ها نصف میشود.
3- پلان ابلیک: اندازه ها حقیقی که به دوصورت دو زاویه 45 درجه و دیگری بصورت یک زاویه 30درجه و یک زاویه 60 درجه میباشد.
4- نما ابلیک: خط Y 2/1 اندازه حقیقی.
............................
پرسپكتيوهای آگزنومتریک
پرسپكتيوهای آگزنومتریک
پرسپكتيوهای آگزنومتریک

پرسپکتیو :
عبارت است از نشان دادن تصوير يك جسم بر روي يك صفحه به نام صفحه تصوير.
پرسپكتيو تنها تصويري است كه چشم انسان آن را به عنوان واقعيت قبول مي كند.
در واقع پرسپكتيو فضاي سه بعدي را روي سطح دو بعدي ايجاد كرده و عمق اجسام را نشان مي دهد.
تصاوير موازي يا پارالاين (آگزنومتريك):
در اين نوع تصاوير خطوط جسم به گريز نمي روند بلكه با هم موازيند. اين نوع تصاوير ترسيمشان آسان بوده و براي نشان دادن جزئيات در سطوح افقي براي كارهاي گرافيكي بسيار مناسبند.
تصاوير آگزنومتريك يا پارالاين را مي توان به شرح زير نام برد :
1) تصاوير ايزومتريك
2) تصاوير دي متريك
3) تصاوير تري متريك
4) تصاوير ابليك
تصاوير ايزومتريك :
در اين نوع تصاوير محورهاي OX , OY هر كدام با خط افق زاويه 30 درجه مي سازند و ابعاد و اندازه ها به نسبت (1 / 1) رسم مي شود.
نكته 1 :


در تصاوير ايزومتريك ابعاد و اندازه ها در حدود 18 درصد بزرگتر از اندازه واقعي به نظر مي رسند.
تصاوير ديمتريك :

در اين نوع تصاوير يك محور به اندازه 7 درجه و يك محور به اندازه 42 درجه با خط افق زاويه مي سازد. در اين حالت ابعاد و اندازه ها بر روي محور OZ و محوري كه زاويه 7 درجه مي سازد به نسبت (1 / 1) و بر روي محوري كه زاويه 42 درجه مي سازد به نسبت (3 / 2) يا (4 / 3) طول واقعي ترسيم مي شود.

تصاویر تریمتریک :
در تصویر تریمتریک پرسپکتیو از سه زاویه بین محورهای نابرابر تشکیل می شود. بنابراین ، سه زاویه جداگانه مورد نیاز است. و تعدد زیادی در نوع و طرح دارد .
بر این اساس میتوان متناسب با نیاز طرح و ویژگی های مورد توجه طراح از این نوع تصویر استفاده نمود.


تصاوير مجسم موازي مايل يا ابليك :
تصاوير ابليك با توجه به تغيير طول يالهاي جانبي آن به سه نوع تقسيم مي شوند كه عبارتند از :
1) تصاوير كاوالير
2) تصاوير جنرال
3) تصاوير كابينت
تصاوير كاوالير:

در اين تصاوير فقط يك محور با زاويه 45 درجه رسم مي شود در اين پرسپكتيو تمامي طولها به نسبت (1 / 1) ترسيم مي گردد.
تصاوير جنرال :

اين تصاوير مانند پرسپكتيو كاوالير رسم مي گردد با اين تفاوت كه طولها بر روي محوري كه با زوايه 45 درجه رسم شده است به نسبت (3 / 2) تا (4 / 3) ترسيم مي شوند.
نكته 1:
تصاوير ابليك را مي توان به شكل ديگري نيز تقسيم بندي كرد.
نما ابليك :
در اين نوع تصاوير با استفاده از نماي جسم پرسپكتيو ترميم مي شود.
پلان ابليك :
در اين نوع تصاوير با استفاده از پلان جسم پرسپكتيو ترسيم مي شود.
نكته 2 :
پلان ابليك بيشتر با زواياي 30 و 60 درجه يا با زواياي 45 و 45 درجه ترسيم مي شوند.


پرسپكتيوهای آگزنومتریک
پرسپكتيوهای آگزنومتریک
پرسپکتیو :
عبارت است از نشان دادن تصوير يك جسم بر روي يك صفحه به نام صفحه تصوير.
پرسپكتيو تنها تصويري است كه چشم انسان آن را به عنوان واقعيت قبول مي كند.
در واقع پرسپكتيو فضاي سه بعدي را روي سطح دو بعدي ايجاد كرده و عمق اجسام را نشان مي دهد.
تصاوير موازي يا پارالاين (آگزنومتريك):
در اين نوع تصاوير خطوط جسم به گريز نمي روند بلكه با هم موازيند. اين نوع تصاوير ترسيمشان آسان بوده و براي نشان دادن جزئيات در سطوح افقي براي كارهاي گرافيكي بسيار مناسبند.
تصاوير آگزنومتريك يا پارالاين را مي توان به شرح زير نام برد :
1) تصاوير ايزومتريك
2) تصاوير دي متريك
3) تصاوير تري متريك
4) تصاوير ابليك
تصاوير ايزومتريك :
در اين نوع تصاوير محورهاي OX , OY هر كدام با خط افق زاويه 30 درجه مي سازند و ابعاد و اندازه ها به نسبت (1 / 1) رسم مي شود.
نكته 1 :
در تصاوير ايزومتريك ابعاد و اندازه ها در حدود 18 درصد بزرگتر از اندازه واقعي به نظر مي رسند.
تصاوير ديمتريك :
در اين نوع تصاوير يك محور به اندازه 7 درجه و يك محور به اندازه 42 درجه با خط افق زاويه مي سازد. در اين حالت ابعاد و اندازه ها بر روي محور OZ و محوري كه زاويه 7 درجه مي سازد به نسبت (1 / 1) و بر روي محوري كه زاويه 42 درجه مي سازد به نسبت (3 / 2) يا (4 / 3) طول واقعي ترسيم مي شود.
تصاویر تریمتریک :
در تصویر تریمتریک پرسپکتیو از سه زاویه بین محورهای نابرابر تشکیل می شود. بنابراین ، سه زاویه جداگانه مورد نیاز است. و تعدد زیادی در نوع و طرح دارد .
بر این اساس میتوان متناسب با نیاز طرح و ویژگی های مورد توجه طراح از این نوع تصویر استفاده نمود.
تصاوير مجسم موازي مايل يا ابليك :
تصاوير ابليك با توجه به تغيير طول يالهاي جانبي آن به سه نوع تقسيم مي شوند كه عبارتند از :
1) تصاوير كاوالير
2) تصاوير جنرال
3) تصاوير كابينت
تصاوير كاوالير:
در اين تصاوير فقط يك محور با زاويه 45 درجه رسم مي شود در اين پرسپكتيو تمامي طولها به نسبت (1 / 1) ترسيم مي گردد.
تصاوير جنرال :
اين تصاوير مانند پرسپكتيو كاوالير رسم مي گردد با اين تفاوت كه طولها بر روي محوري كه با زوايه 45 درجه رسم شده است به نسبت (3 / 2) تا (4 / 3) ترسيم مي شوند.
نكته 1:
تصاوير ابليك را مي توان به شكل ديگري نيز تقسيم بندي كرد.
نما ابليك :
در اين نوع تصاوير با استفاده از نماي جسم پرسپكتيو ترميم مي شود.
پلان ابليك :
در اين نوع تصاوير با استفاده از پلان جسم پرسپكتيو ترسيم مي شود.
نكته 2 :
پلان ابليك بيشتر با زواياي 30 و 60 درجه يا با زواياي 45 و 45 درجه ترسيم مي شوند.
منبع: standpoint.blogfa.com
Similar threads
Similar threads
-

-
 آشنایی با واحد ها و دروس مقطع کارشناسی ارشد معماری
- شروع شده توسط mpb
- پاسخ ها: 13
-

-
-